|
Hot Tip: When using the pen tool in Inkscape, it can be difficult to end your line. Double-clicking should work, but I find my mouse (or maybe my hand) to be finicky in this respect. Simply pressing the return or enter key ends the line and enables you to start a new line anywhere you want!
0 Comments
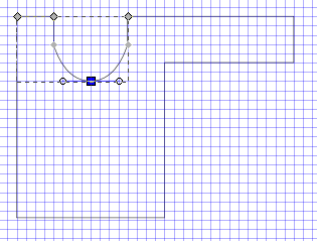
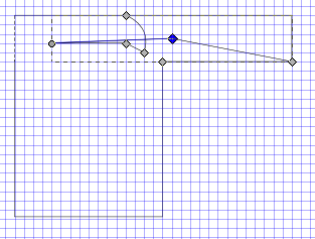
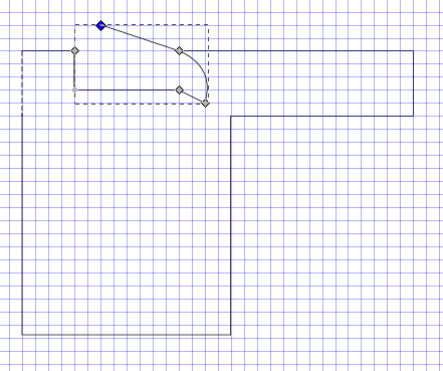
In this section of the tutorial we will make nodes corner, smooth, or symmetric, and make selected segments into lines or curves. 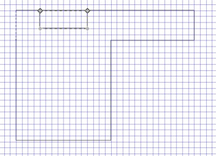 Begin by drawing the schematic you see here. Review the earlier sections of the tutorial if you're unsure how (scroll down for the earliest ones). Choose the Nodes tool from the toolbar on the left-hand side of your Inkscape window (2nd one down) and click on the collar. Across the top of your Inkscape window you should see several icons. There should be faint gray vertical lines between the 2nd and 3rd, the 4th and 5th, and the 6th and 7th icons. We will be using the 7th - 10th and 11th & 12th icons in this section of the tutorial. Select the node at the lower left corner of the collar and press Shift +C or click the 7th icon. It should say "Make selected nodes corner" when your mouse hovers over it. This will split the node into two nodes which angle (rather than arch) away from each other when dragged. 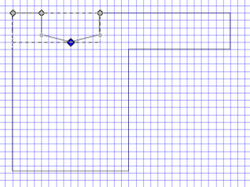 Drag one of the nodes down one square and to the center of the collar. Now click on the 8th icon (or press Shift+S). 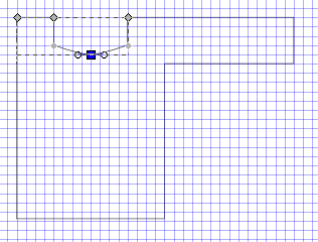 You should see two handles coming out of the node. Drag one out to the edge of the neckline. 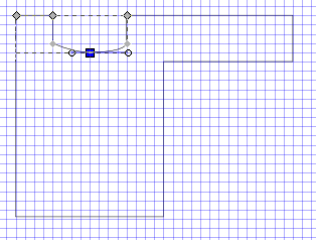 We have just "smoothed" the node. Let's make it symmetric by clicking the 9th icon.  Isn't that neat? Drag the node a little farther down and see what happens. Now click the 10th icon or press Shift+Y. This activates the Auto-Smooth function, which changes the curve a little but mostly makes a difference when moving adjacent nodes.
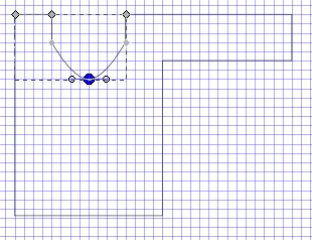
Try changing from Auto-Smooth and back, moving the adjacent nodes each time, to see the difference. Now let's make those smooth curves at the bottom of our collar back into straight lines. Select two adjacent nodes at the bottom of the neck, and press Shift+L or the 11th icon. 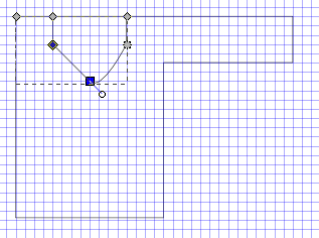 Now press Shift+U (or the 12th icon) to change it to a curve. Move the handles until you're satisfied. Notice this doesn't change it back to the same curve. You'd want Edit--Undo (Ctrl+Z) for that.  These are really useful tools--I hope you enjoyed learning about them.
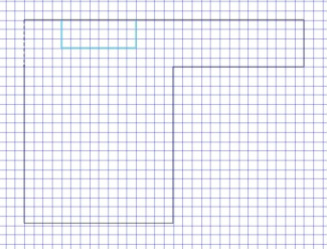
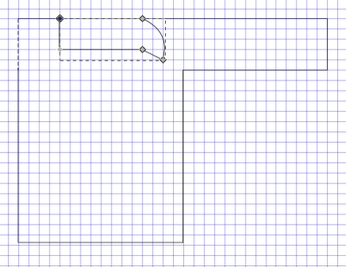
Visit the whole tutorial here. This section of the tutorial will cover nodes, or those little knobby things along a line that you can manipulate to suit your drawing. We will select, move, add, and subtract nodes, join two nodes into one or connect them with a new segment, split one node into two or delete a segment that connects them. In Part 2 we will make nodes corner, smooth, or symmetric, and make selected segments into lines or curves (very cool!).  Begin by pressing F2 or selecting the Nodes tool from the toolbar. The Nodes tool is second in line, right beneath the select tool (plain arrow). Now click on any object to select.
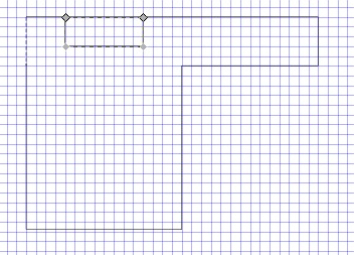
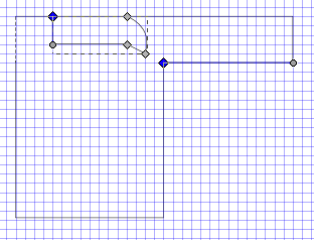
Large and small square nodes appear. Click on a node to select it, or the segment between two nodes to select both nodes. Shift+Click selects several nodes in succession. Tab selects the next node; Shift+Tab selects the previous node. Click anywhere outside the line to deselect all nodes. Make a schematic similar to the one above, with a square neckline. Click on one of the small nodes and drag it diagonally downward. 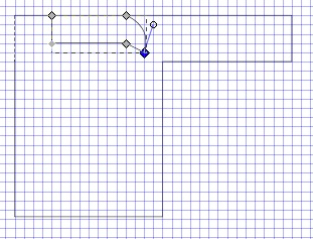 The blue line with a circle at the end is called a handle. You can select and drag it, too. See what happens when you do. Ctrl+Drag restricts a node's movement to horizontal or vertical, and Ctrl+Alt+Drag takes it along the direction of the node's handles. You can also use your keyboard's Arrow keys to move nodes. Across the top of your Inkscape window (in Node mode) there should be a row of icons. If you hover your mouse over each one you can read a description of its function. Select the node or segment first, then click on the icon to implement. If you're as bad with a mouse as I am, you may prefer keystroke commands. Double-click or Shift+Alt+Click anywhere on a selected path to add a new node at that point without changing the shape of the path. Ctrl+Alt+Click to delete. Now I'm going to show you a few tricks that may or may not be useful to you in drawing schematics. First up is Join Nodes. Select two end nodes. In this case, the one at the top corner of the collar and one on the sleeve. First I selected the sleeve line with Shift+Click, then the nodes one at a time using Shift+Click for the second one I chose. The lower nodes of the collar won't work for this because they are along the path of the neckline, but you can choose either sleeve node.
Then choose the third icon which shows two nodes being made into one. Nifty, huh? Undo all that (Edit -- Undo or Ctrl+Z) and choose the two nodes at the top of the collar. Choose the sixth icon, the one that shows two nodes connected by a segment becoming open (unconnected). Whee! Now connect them by clicking the fifth icon. What about the fourth icon? This one's pretty neat. It splits the node into two nodes in order to move them separately.
I found the Inkscape manual very helpful in preparing this tutorial. A great resource!
Next up: Nodes Part 2 including some really wonderful features. 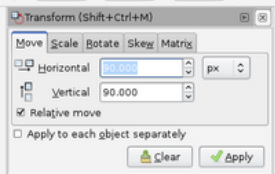 This section of the tutorial will cover the Transform Menu: Move, Scale, Rotate, Skew, and Matrix.
First, select the object you intend to transform. This might be a piece of your schematic or the entire drawing. Then choose Object -- Transform from the top menu or press Shift + Ctrl+ M. Under "Move" you have horizontal and vertical options. To the far right you have your choice of units: pixel, point, pc (which I can only hope doesn't stand for parsec (3.26 light years or 30.9 trillion km)), millimeters, meters, inches, feet, and centimeters. Choose a unit and fill in the amount of horizontal and/or vertical movement. Use the arrow keys to raise and lower the amount if you wish. Make sure the box next to "Relative move" is checked, otherwise you will not be moving the entire shape as one piece. Finally, click "Apply." Another option for moving shapes is not to use the Transform menu at all but to use the hand cursor and mouse to drag it or arrow keys to nudge it once it has been selected. The "Scale" function is incredibly useful to adjust a schematic accidentally drawn to the wrong proportions or to shrink an entire drawing to fit on the page. This has options to the far right as well. Shrink or expand a drawing by a certain percentage or to a certain number of pixels or parsecs. You can set one dimension and then select "Scale proportionally" to shrink or expand the entire schematic exactly the way it looks, or you can select only the sleeves, say, and reduce the height by 50% if, for instance, you forgot you were using one grid square to mean 2 inches instead of only 1. You must click "Apply" to see the results. "Rotate" and "Skew" are two other useful options for designers looking to adjust schematics or transform copied objects. They are fairly straightforward so I won't go into them further. "Matrix" can flip and stretch the drawing. "A" stretches the width, "B" stretches widthwise and slants (positive inputs slant upward, negative slant downward), "C" stretches lengthwise and slants (positive inputs slant to the right, negative slant to the left), "D" stretches lengthwise, E and F may be for shifting perspective in 3D drawings. They return text boxes to their original positions and don't appear to affect the transformed (2D) schematic itself. Next up: Using nodes to control curves. Read the Tutorial from Part 1 here. (Scroll down for earlier entries.) This section of the tutorial will cover combining shapes and turning lines into curves. Let's say we want to draw the schematic for a cape. We can first draw several shapes . . . 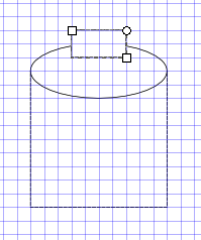 . . . then select them (with the select tool) . . . 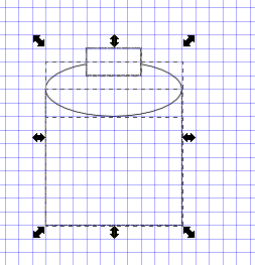 . . . then go to the Path menu . . . 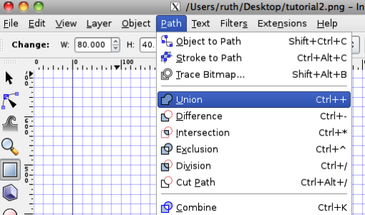 . . . and choose Union. The shapes will merge and the inner lines disappear. Here is the final cape schematic, with a center dividing line and a dotted hemline. 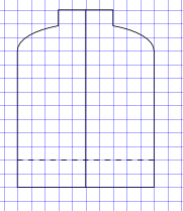 Neat, huh? Now let's make a curve. First we draw a few segments. (This is a waistline.) 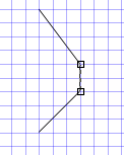 Then we choose "Edit paths by nodes" from the toolbar. 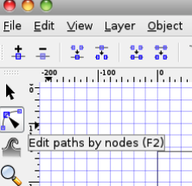 Now we select the two nodes of the middle segment (click on the first one, then shift-click to select additional nodes) and press shift+U. One node has a red dot on top of it. 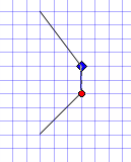 Move the dot until you get the curve you want. Ignore the line connecting the dot to the curve. (It's a tangent line.) 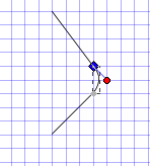 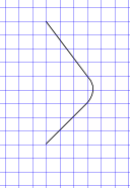 Ta-da!
In this section of the tutorial, we'll label the schematic using lines and circles. Lines first. Draw lines (using the pen tool) for every flat measurement on your schematic. 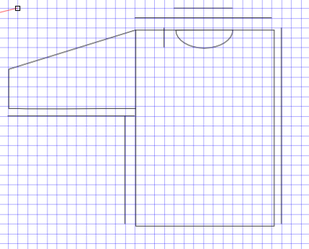
Notice I have measurements for cross-back and collar, and I put the shorter line on top. Next, use the select tool (F1) to select all the measurement lines. Go to Object--Fill and Stroke--Stroke style and choose start and end markers. 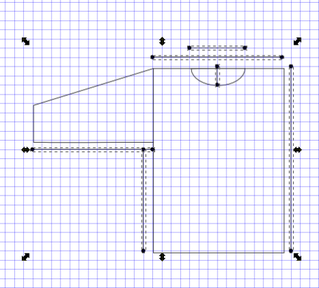
Now for the round measurements. We'll use the circle tool for these. 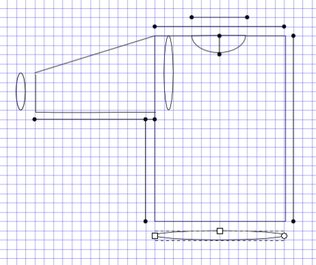
You can leave them like this, or you can make them into arcs. Move the round nodes, then click "Switch to arc" at the top of your window. 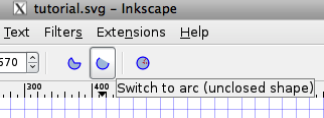
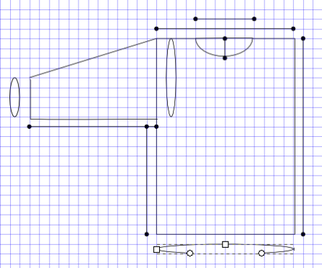
Again, select them all, then add start and end markers. 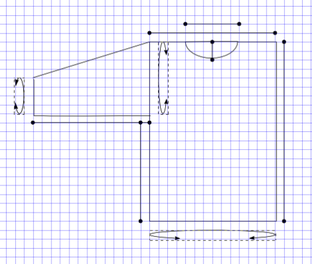
Now add numbers with the Text tool. 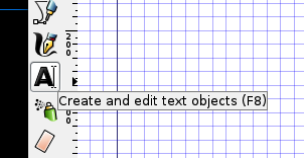
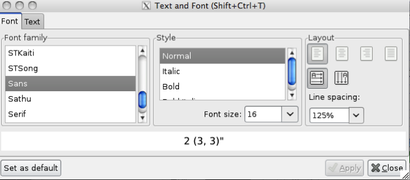
Once you have entered some text, you can fine-tune it using the Text and Font dialog. 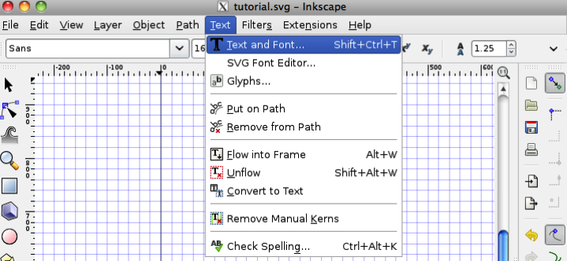
And there you have it. 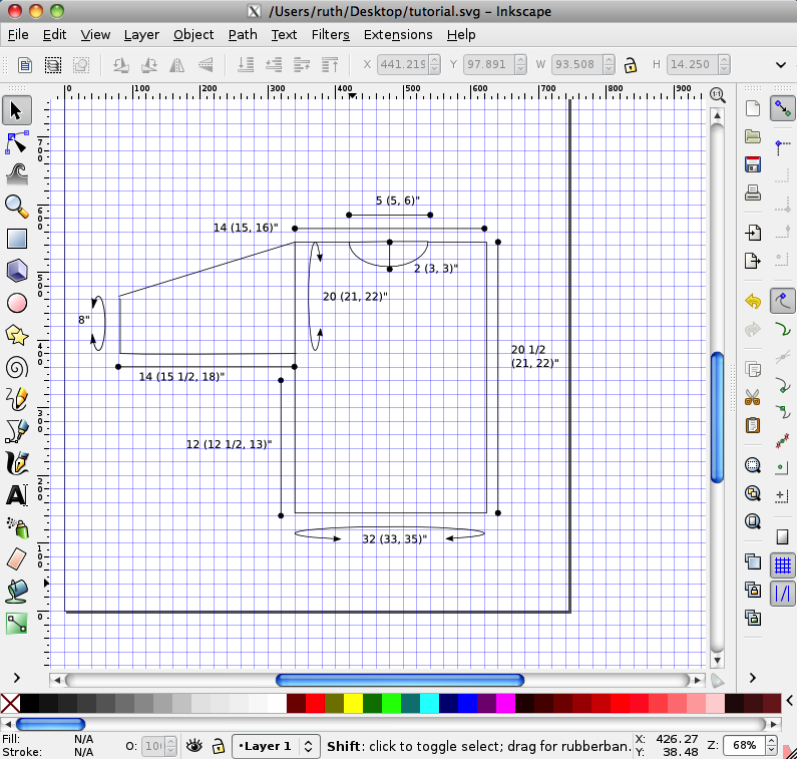
Next up: combining shapes (my favorite!)
This section of the tutorial will cover using shapes and lines to draw an entire garment. Let's give your rectangle a neckline. Select the circle tool from the sidebar between the cube and the star. 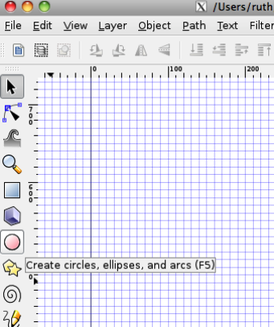 Now click and drag to draw an ellipse. 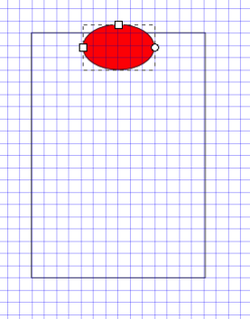 If you want to move it, click on the arrow at the top of your sidebar ("Select and transform objects") or press F1. 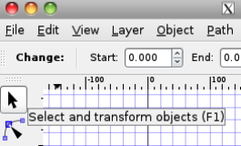 Then click on the ellipse. 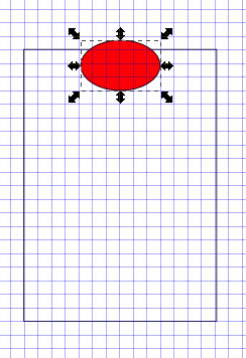 The cursor turns into a hand, and you can move the ellipse anywhere you want. Let's center it around the top of the rectangle. 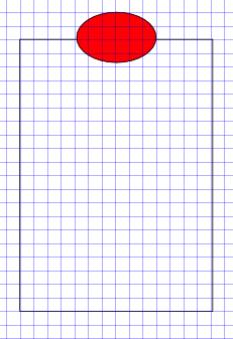 You can also use the arrows that appear when you select an object to resize it. If you click on the center of a selected object, you can rotate it. But let's try something else with this ellipse. Click on the circle tool again. Notice the square and circular nodes. Move a circular node until you have an arc below the top of the rectangle. While you're here, click on the Fill and Stroke icon in the upper right corner. Click on the rectangle, select "This tool's own style" then click "Take from selection" for new drawings. Change the Fill color for this arc in the Object menu. Your drawing should now look like this: 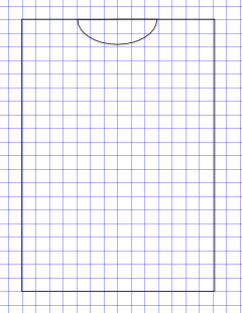 By the way, if you ever scroll away from your drawing and can't get back, just hit 5 and it will reappear. We'll finish this drawing with lines. Find the pen on your sidebar.  Now click on the body of your sweater where you want the sleeve to start. I'm clicking at the bottom of the sleeve because my garment has the decreases along the top of the sleeve, so that will be a diagonal line. Drag until your line is the length of your sleeve, then double-click to end the line. 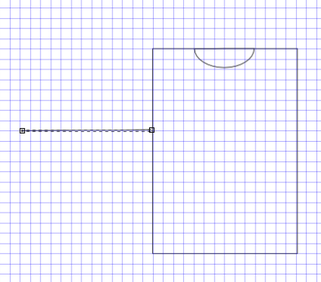 Draw two more lines to finish the sleeve. We only need one sleeve on a schematic. 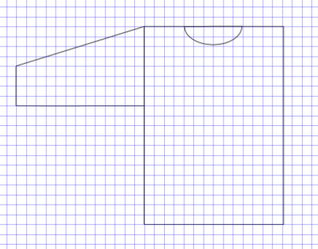 Next up: labeling the sizes
In this section of the tutorial, we'll take a quick look at the Help menu and then go on to start our drawing. To begin drawing the schematic we will
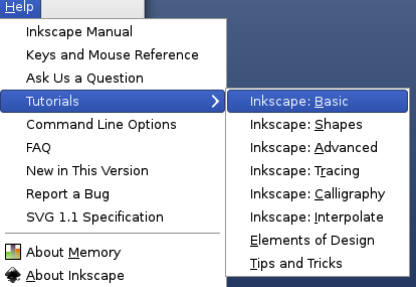 First, a look at the Help menu. This menu (at the top of your Inkscape window) lists a manual and several helpful tutorials. If any of my tutorial is unclear or doesn't cover a particular element you'd like to use, you may either leave a comment below or use the Help menu. Before we set the fill color, we need an object to fill. On your sidebar, click on the square between the magnifying glass and the cube. 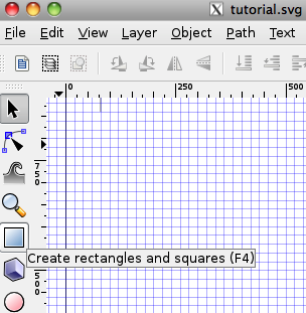 Place the cursor where you want to start your rectangle. An X should appear on your screen. Drag diagonally, then release. Don't be concerned if nothing appears while you drag. You should have a blue rectangle on your drawing space when you release. 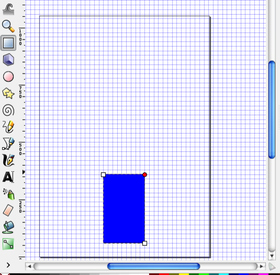 Size the rectangle by dragging the square corners. (The circular corners round the shape--try it!) If your grid is small enough, you can do one square per unit of measure---or two squares if you have a lot of half units. Choose the set of measurements for a single size (usually the sample size of Women's Small) and stick to it for the entire schematic. As long as it fits on the page, don't worry about it being too big. Your editor can always shrink it, but expanding may cause problems with image sharpness. Next, we set the fill color and stroke preferences. Under Object (at the top of your Inkscape window), select Fill and Stroke. 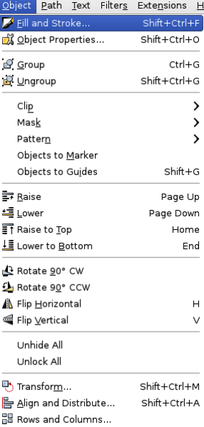 There are several ways to choose your color. The simplest way for me is just to fill in a code under the colored stripes where it says "ffffff00." White is ffffffff, which is all I ever need. 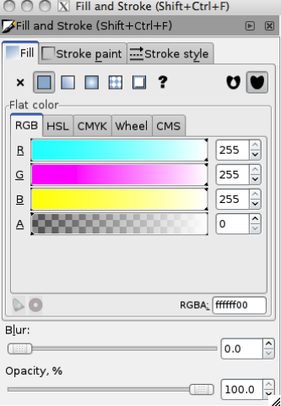 You can also select Wheel instead of RGB, and just click on the desired color. 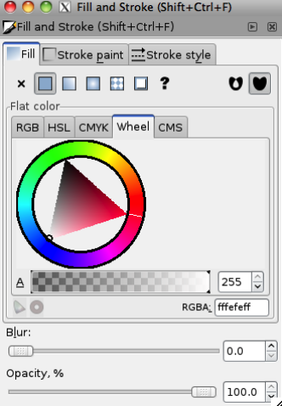 Stroke setting is next. If your white rectangle has a solid line around it, there is no need to do anything. But if it has a dotted line, change it to a solid line under the Stroke style tab of the Fill and Stroke dialog. 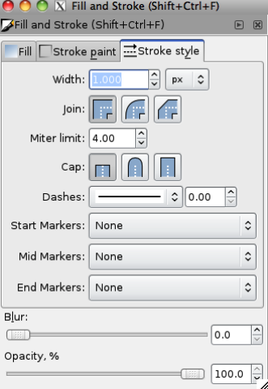 While we're here, let's fix these settings for your Inkscape use. You can always change them later. Up at the top of your window, there should be Fill and Stroke preference images (if you don't see them, make sure you still have the rectangle function selected). Click there.  That should open a box like the one below. Select "This tool's own style" and then click "Take from selection." 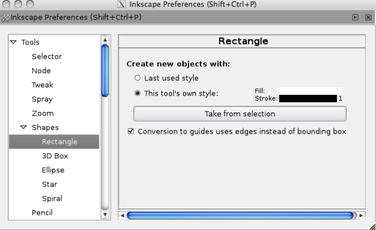 Now every rectangle you draw will start as white with a black outline. You can always choose another fill color if you want to do something fancier than a schematic, but it will be white when you first draw it.  Remember to save your work using the File menu or simply ctrl+S .
Next up: outlining an entire garment (I can hardly wait!) Here's Part One of a tutorial to walk you through drawing a basic schematic in Inkscape. This section of the tutorial will cover
 When you first open Inkscape, the window looks like the one above. Before you get started drawing, you'll want to set your page dimensions and set up a grid. First go to the File menu and open the Document Properties dialog (notice keystroke options are shown to the right). 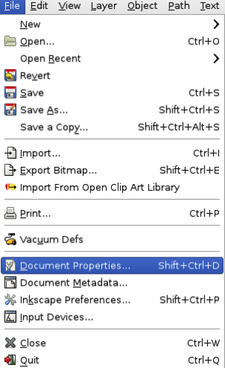 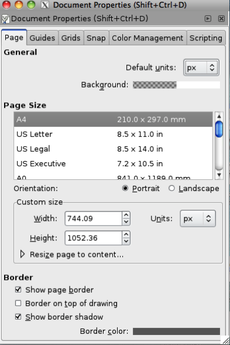 Choose the size paper you plan to use (under Page Size), and whether you want Portrait or Landscape orientation. Fit the page to the drawing area by pressing the 5 key. Your page should now look something like this: 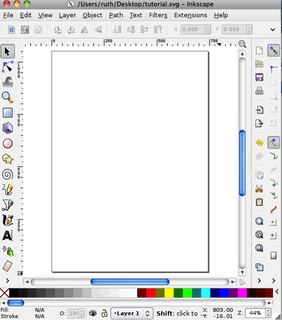 Now go to the Grid tab of the Document Properties dialog. 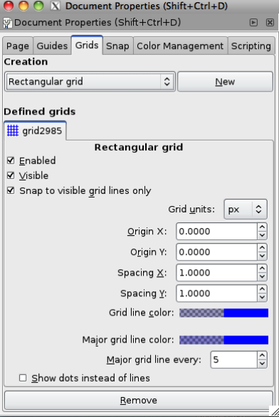 Set it up as I have here for now, but feel free to play around with the units and spacing once you're comfortable. One more thing while we're here: 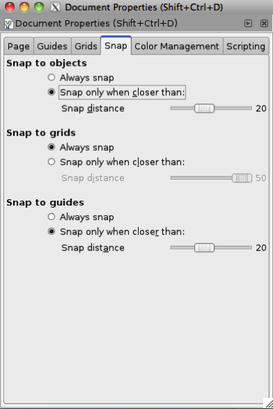 The Snap tab allows you to tell the program how much control you want to have. I want to keep my schematic right on the grid. Now your window should look something like this: 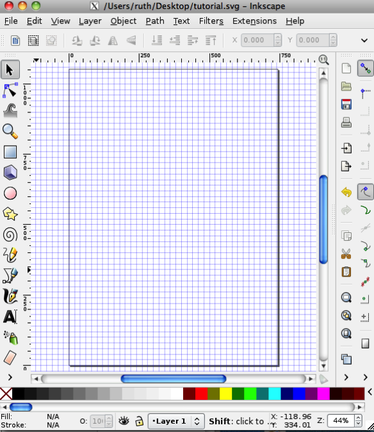 Save your work now, even though you haven't done any drawing yet. Go to File, then select Save As. 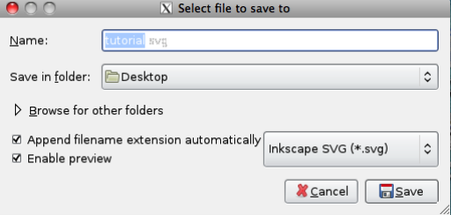 Choose a name and a location, then click Save.
Next we'll put the basic shapes together to outline a garment. |
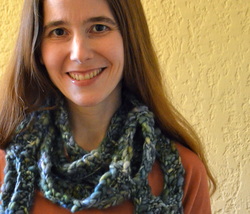
Hi! I'm Kangath---knit designer, musician, writer, and mother 
Click here to join the Kangath Knits email list
for insider updates and special deals. Subscribe to
Kangath Knits: 
Ruth Roland is a top Baton Rouge, LA music lesson instructor on TryMusicLessons.com! Good ReadsAmy Herzog Designs
canaryknits dull roar Knit and Tonic Linda Marveng needled Ramblings The Sexy Knitter Sheep to Shawl Trappings and Trinkets Two Sides of the Same Stitch Yarn Harlot Archives
February 2018
Categories
All
|
 RSS Feed
