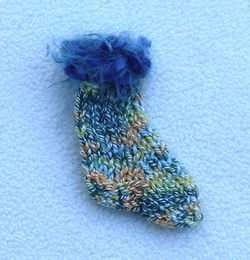
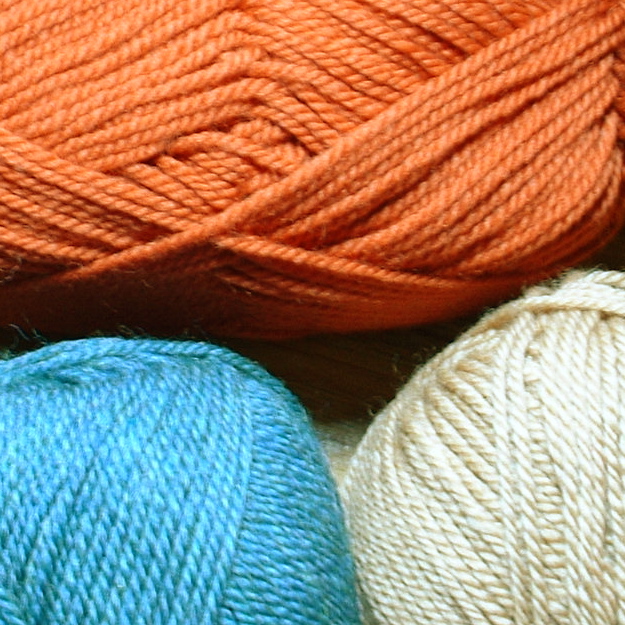
 I've just started my very first knit-a-long, for the free pattern Little Sock (Ravelry link). A fast knit, it's also interesting without requiring too much thought. It takes a combination of bulky and fingering weight yarn, and is good for using up scraps.
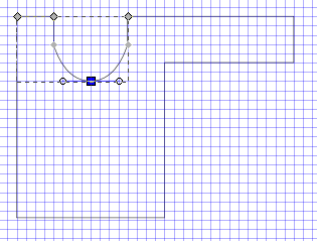
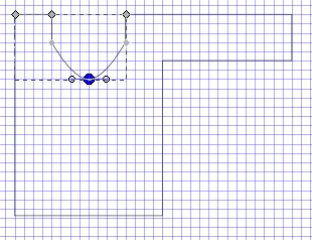
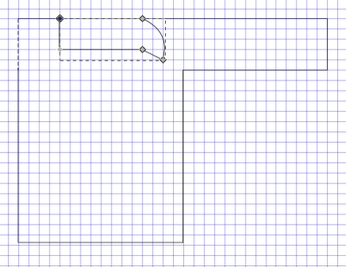
I love this pattern and am putting together a great prize package for one lucky knitter, plus every photographed project linked to the Ravelry pattern page gets one of my patterns free. Can't beat that! In this section of the tutorial we will make nodes corner, smooth, or symmetric, and make selected segments into lines or curves. 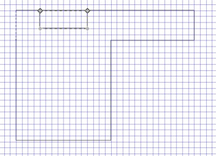 Begin by drawing the schematic you see here. Review the earlier sections of the tutorial if you're unsure how (scroll down for the earliest ones). Choose the Nodes tool from the toolbar on the left-hand side of your Inkscape window (2nd one down) and click on the collar. Across the top of your Inkscape window you should see several icons. There should be faint gray vertical lines between the 2nd and 3rd, the 4th and 5th, and the 6th and 7th icons. We will be using the 7th - 10th and 11th & 12th icons in this section of the tutorial. Select the node at the lower left corner of the collar and press Shift +C or click the 7th icon. It should say "Make selected nodes corner" when your mouse hovers over it. This will split the node into two nodes which angle (rather than arch) away from each other when dragged. 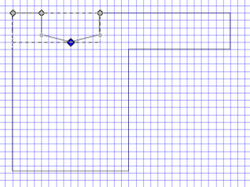 Drag one of the nodes down one square and to the center of the collar. Now click on the 8th icon (or press Shift+S). 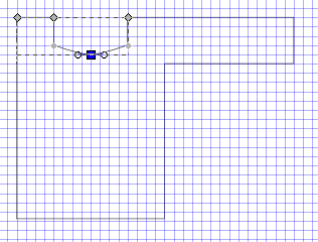 You should see two handles coming out of the node. Drag one out to the edge of the neckline. 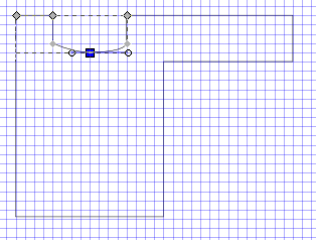 We have just "smoothed" the node. Let's make it symmetric by clicking the 9th icon.  Isn't that neat? Drag the node a little farther down and see what happens. Now click the 10th icon or press Shift+Y. This activates the Auto-Smooth function, which changes the curve a little but mostly makes a difference when moving adjacent nodes.
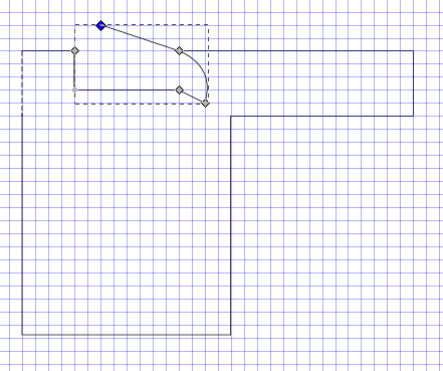
Try changing from Auto-Smooth and back, moving the adjacent nodes each time, to see the difference. Now let's make those smooth curves at the bottom of our collar back into straight lines. Select two adjacent nodes at the bottom of the neck, and press Shift+L or the 11th icon. 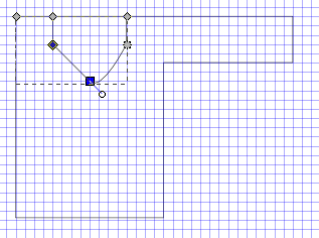 Now press Shift+U (or the 12th icon) to change it to a curve. Move the handles until you're satisfied. Notice this doesn't change it back to the same curve. You'd want Edit--Undo (Ctrl+Z) for that.  These are really useful tools--I hope you enjoyed learning about them.
Visit the whole tutorial here. This section of the tutorial will cover nodes, or those little knobby things along a line that you can manipulate to suit your drawing. We will select, move, add, and subtract nodes, join two nodes into one or connect them with a new segment, split one node into two or delete a segment that connects them. In Part 2 we will make nodes corner, smooth, or symmetric, and make selected segments into lines or curves (very cool!).  Begin by pressing F2 or selecting the Nodes tool from the toolbar. The Nodes tool is second in line, right beneath the select tool (plain arrow). Now click on any object to select.
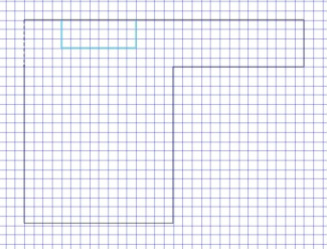
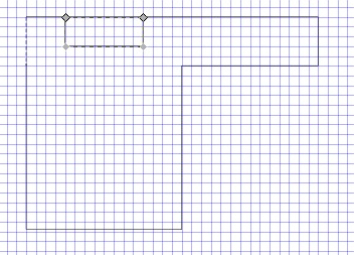
Large and small square nodes appear. Click on a node to select it, or the segment between two nodes to select both nodes. Shift+Click selects several nodes in succession. Tab selects the next node; Shift+Tab selects the previous node. Click anywhere outside the line to deselect all nodes. Make a schematic similar to the one above, with a square neckline. Click on one of the small nodes and drag it diagonally downward. 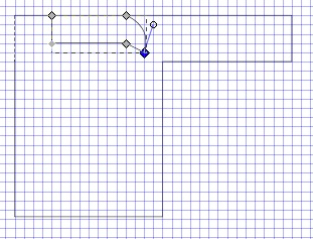 The blue line with a circle at the end is called a handle. You can select and drag it, too. See what happens when you do. Ctrl+Drag restricts a node's movement to horizontal or vertical, and Ctrl+Alt+Drag takes it along the direction of the node's handles. You can also use your keyboard's Arrow keys to move nodes. Across the top of your Inkscape window (in Node mode) there should be a row of icons. If you hover your mouse over each one you can read a description of its function. Select the node or segment first, then click on the icon to implement. If you're as bad with a mouse as I am, you may prefer keystroke commands. Double-click or Shift+Alt+Click anywhere on a selected path to add a new node at that point without changing the shape of the path. Ctrl+Alt+Click to delete. Now I'm going to show you a few tricks that may or may not be useful to you in drawing schematics. First up is Join Nodes. Select two end nodes. In this case, the one at the top corner of the collar and one on the sleeve. First I selected the sleeve line with Shift+Click, then the nodes one at a time using Shift+Click for the second one I chose. The lower nodes of the collar won't work for this because they are along the path of the neckline, but you can choose either sleeve node.
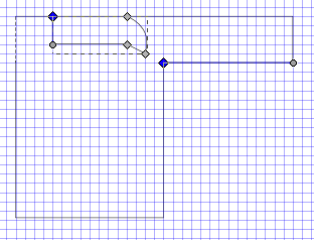
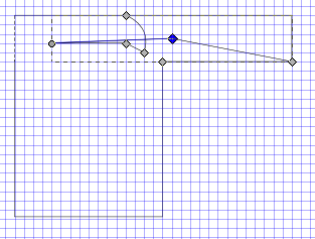
Then choose the third icon which shows two nodes being made into one. Nifty, huh? Undo all that (Edit -- Undo or Ctrl+Z) and choose the two nodes at the top of the collar. Choose the sixth icon, the one that shows two nodes connected by a segment becoming open (unconnected). Whee! Now connect them by clicking the fifth icon. What about the fourth icon? This one's pretty neat. It splits the node into two nodes in order to move them separately.
I found the Inkscape manual very helpful in preparing this tutorial. A great resource!
Next up: Nodes Part 2 including some really wonderful features. 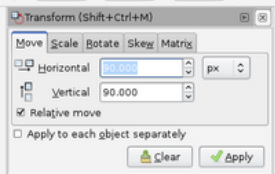 This section of the tutorial will cover the Transform Menu: Move, Scale, Rotate, Skew, and Matrix.
First, select the object you intend to transform. This might be a piece of your schematic or the entire drawing. Then choose Object -- Transform from the top menu or press Shift + Ctrl+ M. Under "Move" you have horizontal and vertical options. To the far right you have your choice of units: pixel, point, pc (which I can only hope doesn't stand for parsec (3.26 light years or 30.9 trillion km)), millimeters, meters, inches, feet, and centimeters. Choose a unit and fill in the amount of horizontal and/or vertical movement. Use the arrow keys to raise and lower the amount if you wish. Make sure the box next to "Relative move" is checked, otherwise you will not be moving the entire shape as one piece. Finally, click "Apply." Another option for moving shapes is not to use the Transform menu at all but to use the hand cursor and mouse to drag it or arrow keys to nudge it once it has been selected. The "Scale" function is incredibly useful to adjust a schematic accidentally drawn to the wrong proportions or to shrink an entire drawing to fit on the page. This has options to the far right as well. Shrink or expand a drawing by a certain percentage or to a certain number of pixels or parsecs. You can set one dimension and then select "Scale proportionally" to shrink or expand the entire schematic exactly the way it looks, or you can select only the sleeves, say, and reduce the height by 50% if, for instance, you forgot you were using one grid square to mean 2 inches instead of only 1. You must click "Apply" to see the results. "Rotate" and "Skew" are two other useful options for designers looking to adjust schematics or transform copied objects. They are fairly straightforward so I won't go into them further. "Matrix" can flip and stretch the drawing. "A" stretches the width, "B" stretches widthwise and slants (positive inputs slant upward, negative slant downward), "C" stretches lengthwise and slants (positive inputs slant to the right, negative slant to the left), "D" stretches lengthwise, E and F may be for shifting perspective in 3D drawings. They return text boxes to their original positions and don't appear to affect the transformed (2D) schematic itself. Next up: Using nodes to control curves. Read the Tutorial from Part 1 here. (Scroll down for earlier entries.) 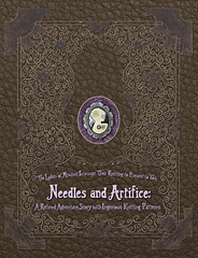 Needles and Artifice by The Ladies of Mischief, pub. Cooperative Press, 2012. This book blew me away. That could be my whole review right there. But you probably want to know what's so amazing. Well . . .
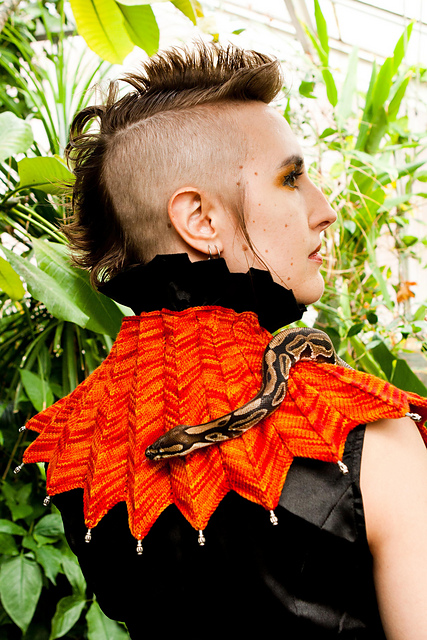
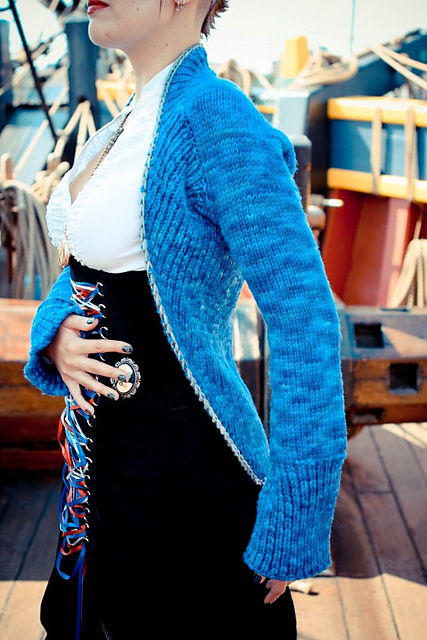
And 20 or so other most interesting patterns. And a steampunk novelette. Not to mention tea. (Well, it doesn't actually come with tea, but tea is frequently invoked.) The book is divided into six parts: Mechanical, Boudoir, Airship, Countryside, High Society, and Mad Science. Each part contains a chapter of the novelette and several patterns. Each pattern involves an intriguing construction and/or stitch. A generous 233 pages, this book is sure to elicit exclamations at every turn. Personally, I found something I wanted to make for myself in every chapter. Sarra Loew's Resilience Top combines brioche rib with gunshot beading for an appealing look. The unusual construction of Katrina Elsaesser's Revolution Shrug is too tempting to pass up, and her Rivet Spats appear eminently useful in the context of this book. I simply must knit the Trials and Tribulations Bloomers. The Legacy Frock Coat, with its intriguing construction resulting in a stylish swoop and easy instructions for further customization, is also on my list. The Mountain Lily Scarf by Heidi Kunkel features a fetching Estonian lace stitch. And I just may surprise myself and knit an Abundance Vest. I'm not a vest-wearer, but the flattering drape of this garment will convert me! 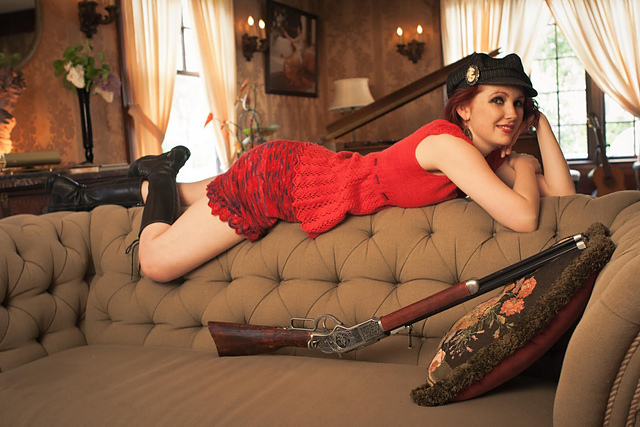 The Trials and Tribulations Chemise and Bloomers---Aimee Skeers I strongly desire the sleeves of Sarra Loew's Cameo Spencer Jacket, though the rest of the piece is not to my taste. The two thigh-high stockings, however, seem eminently wearable. The Amplitude Stockings by Amanda Williams are knit lengthwise and shaped with short rows (gives me goosebumps!). I may end up making just one of those and one of Sarra Loew's Eccentricity Stockings and wearing them together as modeled in the book. I have such a long list of knits now (thanks to the Ladies) that I doubt I'll be able to get a matching pair anytime soon. Nearly half of these patterns are available in only one size, but instructions for shape customization are given for most of those that aren't scarves or hats. I feel obliged to speak out on behalf of those of us with large heads and request more hat sizing options. I will probably knit the Master and Commander Cap by Aimee Skeers, but will have to either alter the instructions or give it to my daughter. And I probably won't be able to resist the Jen Schripsema's Take Flight Bonnet, though it may be a bit tight on the back of my head without modifications (to the pattern, not my head). The Quadrille Overbust Corset by Valerie DiPietro is a work of art. I fear this is the first pattern I will knit from this book. I say "fear" because if I knit it I will be obliged to wear it, and as a mother of two who doesn't even wear clothing as restricting as blue jeans, I don't relish a corset-wearing life. I could always have it stuffed. . . . 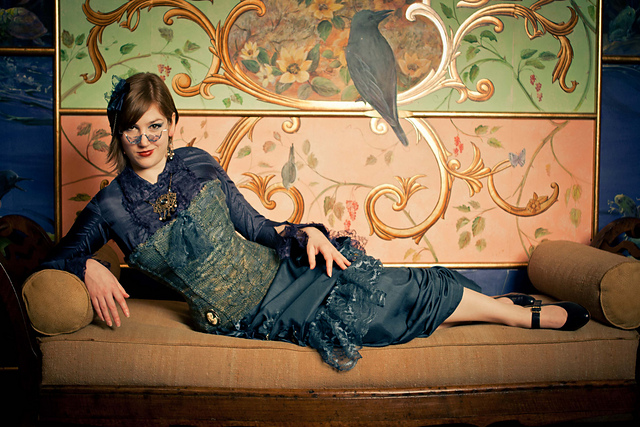 Quadrille Overbust Corset--Valerie DiPietro The Ladies who partake in the "busk-snapping adventure" are loyal, resourceful, and speak in colorful language ("horse bobbles" and "thrice-frogged idiot"). The story itself is a riotous introduction to characters---and airships---I hope to see again.
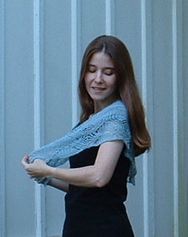
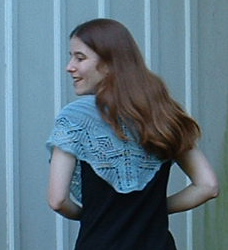
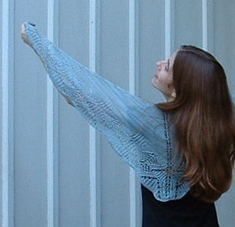
Photographer Jessica Glein deserves special mention for capturing both the knitterly details and the personality of each piece in a thoroughly engaging manner. The photography alone is worth the price of the book. Congratulations to the The Ladies of Mischief and Cooperative Press for this resounding success! Disclosure: Cooperative Press sent Kangath a copy of Needles and Artifice FREE for review. Kangath was not compensated for the preceding review. All opinions expressed in the review are the blog author's and are not necessarily the opinions of Cooperative Press or the Ladies of Mischief. 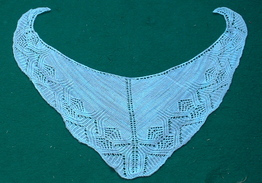 I finished this shawl last week, but am only now getting around to photographing it. It's Anna Dalvi's Fields of Malachite shawl from Ancient Egypt in Lace and Color in Lisa Souza Lace in the Lake Superior colorway. This was the first time I really felt compelled to knit a shawl in the color specified, but I wanted to use this yarn and I wanted to knit that pattern. I photographed it on a green blanket, though---that should count for something. This pattern was a perfect combination of easy knitting and thoughtful lace. Just when I got tired of stockinette, it was time for the charts. Just when the charts were making my eyes spin, it was time for the last few rows. Wonderful synchronicity of my moods with the design. Thank you, Anna!
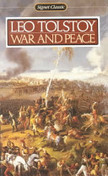 Used to be I wouldn't be especially proud of reading a book from start to finish. But I don't even remember when I started this one---at least six months ago---and it's been slow going. I think the reason I didn't read it before my stroke was I didn't expect to find it particularly interesting. And indeed, the war bits often quite literally put me to sleep. But it's a good story, and Tolstoy shares some excellent insights--many repeatedly, which helps make it into a proper novel instead of a slim volume.
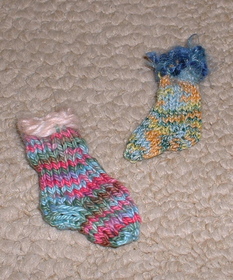 (not muffins) (not muffins) While we wait for me to prepare the pattern for these cute little mini socks, how about a vegan mocha muffin recipe? Vegan Mocha Muffins 1 1/2 cups whole wheat flour 1/2 cup sugar 3 Tablespoons cocoa 1/2 teaspoon salt 1 teaspoon baking soda Mix these ingredients together. Then add
Put in muffin tin and bake at 375 degrees Fahrenheit for around 15 minutes or until top springs back when lightly pressed. Yum!
|
Hi! I'm Kangath---knit designer, musician, writer, and mother 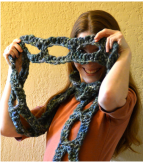
Click here to join the Kangath Knits email list
for insider updates and special deals. Subscribe to
Kangath Knits: 
Ruth Roland is a top Baton Rouge, LA music lesson instructor on TryMusicLessons.com! Good ReadsAmy Herzog Designs
canaryknits dull roar Knit and Tonic Linda Marveng needled Ramblings The Sexy Knitter Sheep to Shawl Trappings and Trinkets Two Sides of the Same Stitch Yarn Harlot Archives
February 2018
Categories
All
|

 RSS Feed
