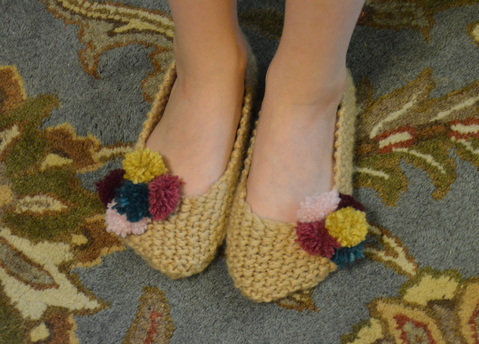
 Today we gave my daughter's piano teacher the slippers we made for her. She was pleased for several reasons. It was good timing because she had just worn some holes in one of her pairs of slippers. But also she appreciated their softness. Apparently someone in her family used to knit slippers for her, but they were scratchy. We knew these weren't scratchy because Gwen gave them a test run. She almost didn't take them off . . . 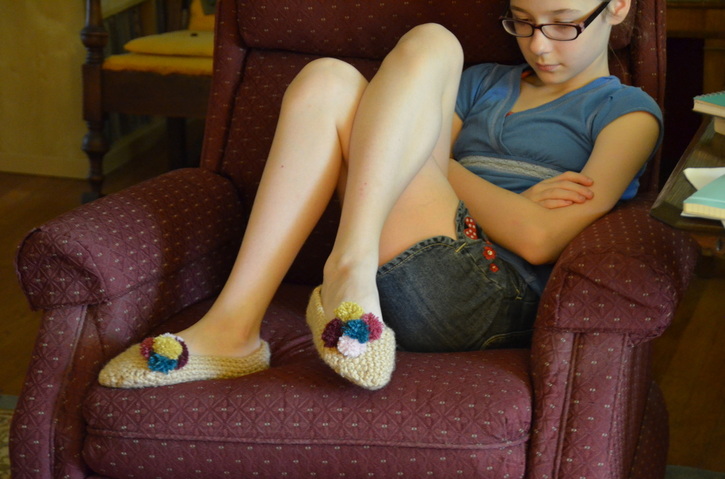
0 Comments
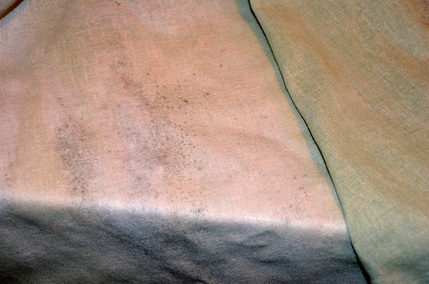 Before Before At the end of last year I bought supplies to dye the curtains in our office. I tested one panel in our front-loader washing machine using the top-loader instructions here and here. But I got a few streaks in the sample and thought I needed to find someone with a top-loading machine to finish the batch. Fast-forward six months. While searching for the instructions I used to dye the sample, I ran across instructions for dyeing in a front-loader. In fact, there were more results with front-loader instructions than top-loader! I'm kind of glad I didn't get around to finishing the project before I found instructions to use with my own machine. 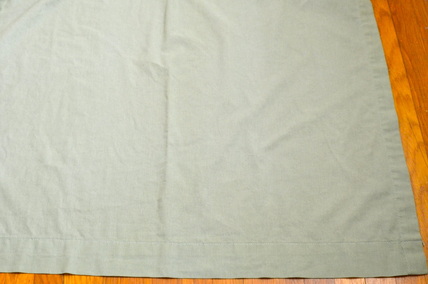 After After I got no streaks in my final curtains. There were some darker blotches, but those may be where there was mildew. Since I did four curtains at a time, I can't show before and after pictures of the same curtain.
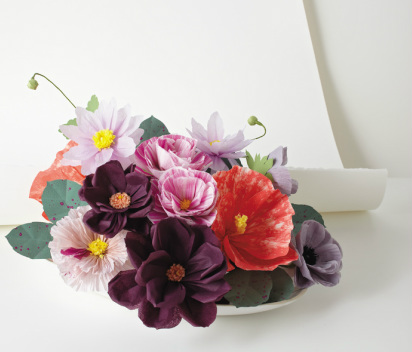
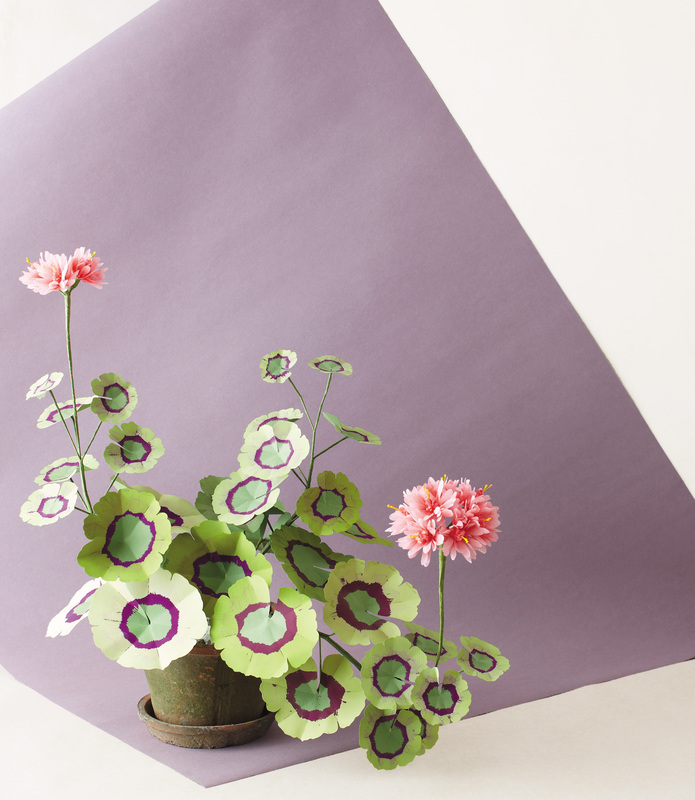
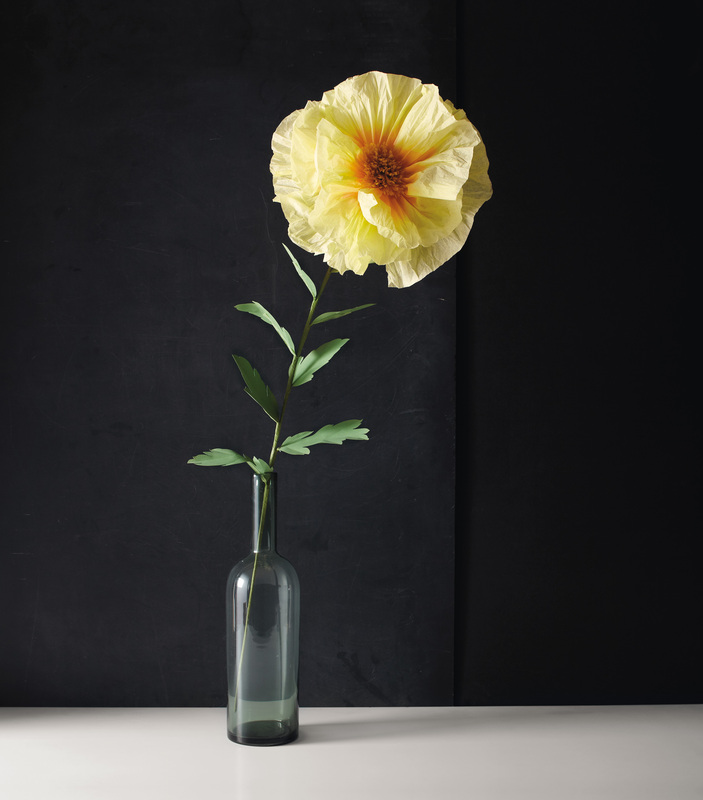
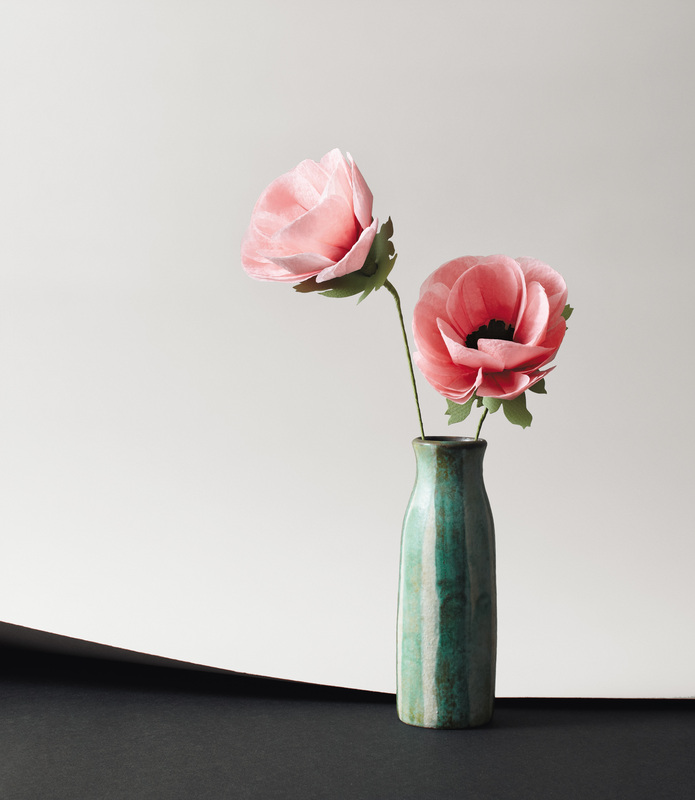
We rehung two undamaged curtains after we had the windows replaced. The overdyed curtains are a slightly darker shade of the same color. I may dye the undamaged ones to match, but I'm not too worried about it. They're back in a corner behind some equipment, so less accessible and harder to take down and rehang. I'm repeating Maureen's instructions below with my modifications. All links are to Dharma Trading Company. I shopped around online, and Dharma had the best prices and the most helpful website. ----------------------------------------------------------------------------------------------------------------------- Front load washers use about 8 gallons of water for a load. So adjustments are based on that number. The amount of dye used was the standard amount specified for the fabric weight. 1) Prewash fabric, preferably in hot water, with Synthrapol or Dharma Professional Textile Detergent. Since my curtains are 100% cotton, and I chose the Procion dye to avoid hot water, I washed in warm with a cold rinse. Wear rubber gloves when removing the fabric from your machine, as fingerprints may affect the dyeing. 2) Completely dissolve 8 cups non-iodized salt in boiling water and add it to the washing machine drum. (It is vitally important to completely dissolve the salt so that the washing machine pump and drain line aren't clogged -- failing to do so can result in a $90+ service call to clean out a load of salt!!) I used dyer's salt for half the curtains and grocery store salt for the other half, and I couldn't tell the difference in the results. The dyer's salt may have dissolved slightly more quickly or easily, but not enough to make a huge time difference. Then again, I don't think I dissolved it thoroughly. I stirred together all 8 cups with about a gallon of boiling water, and there was quite a bit of sludge at the bottom of the bowl. 3) Set the temperature of the water to "warm", and let the machine fill. Since front loading washers sense the load weight, don't expect loads of water at this point. 4) Add 1 Tablespoon calsolene oil and water softener (if your local water could be considered "hard" water). 5) While the washer is agitating the mixture, dissolve the dye in some warm water, then open the washer again and add the dye. 6) Let the washer agitate a bit to mix up the mixture. Put some paper towels or newspapers on the floor, as the water splashes about quite a bit with nothing in the drum and there will be some of the dye mixture on the door which drips out when the door is opened. 7) Wearing rubber gloves, Add the item to be dyed to the drum, and set the machine for a heavy load. The Maytag Neptune's "heavy load" setting takes about 15 minutes. To be safe, time the session, so that the water won't drain out with all of the dye! NOTE: Keep using the timer as this will require a number of interventions before completion! 8) After 15 minutes, turn the machine off, and set the dial back to heavy load. Dissolve 1 cup soda ash in hot water about five minutes before the end of this cycle as it takes a while to completely dissolve. 9) Reset the machine to heavy load. Start again, and slowly add the dissolved soda ash over a 15 minute period. It is apparently important not to add the soda ash directly on top of the fabric. I didn't know what would happen if I poured the soda ash solution into the detergent compartment. So I kept the machine off, pushed the curtains to the back of the machine, and added the soda ash (which I had dissolved in 1/2 gallon of water) 1 cup at a time, swirling the fabric with my gloved hands in between additions. This was sweaty work, and I recommend using the detergent compartment on a sample to see if it works. 10) Turn the machine off and reset to heavy load. Let the fabric tumble in the washer for 30 (light color) to 60 (dark color) more minutes, turning off the machine and resetting to heavy every 15 minutes. After the fabric has been tumbling in the soda ash/dye mixture for the necessary duration, let the washer complete the cycle, making sure that the rinse water is cold. This will rinse out the soda ash. 11) Reset the cycle to heavy load again and add dye fixative based on fabric weight. Agitate for 30 minutes. You will need to turn off the machine and reset it once. I skipped this optional step, since these curtains will only be washed separately and infrequently. 12) Wash in hot water with Milsoft fabric softener and your washing machine detergent of choice. I used 1/4 cup Dharma Professional Textile Detergent, since it is also recommended as an afterwash, and warm water (not hot) with a cold rinse. I recommend doing a test load of rags after dyeing to determine whether there is any dye left in the washer. Although I haven't had any problems, it's better to be on the safe side. --------------------------------------------------------------------------------------------------------------------- Dyeing was a fun experiment, and my pre-teen daughter even helped a little. She and I have plans to use the rest of our dye tie-dyeing pillow cases and baby blankets. I hope this post encourages you to try dyeing something! 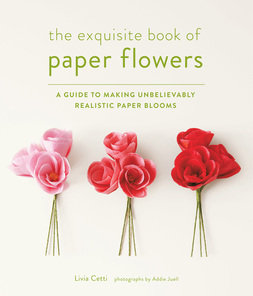 The Exquisite Book of Paper Flowers: A Guide to Making Unbelievably Realistic Paper Blooms by Livia Cetti, photographs by Addie Juell, pub. Stewart, Tabori and Chang (STC Craft), 2014. When I was trying to review this book, my daughter kept stealing it away every time I put it down. Now she's pestering me to take her to buy supplies to make flowers. They're mostly inexpensive (like tissue paper and floral tape) and tools we can use for other crafts (like a glue gun and fringing shears), so I don't mind. Besides, I love these flowers as much as she does! 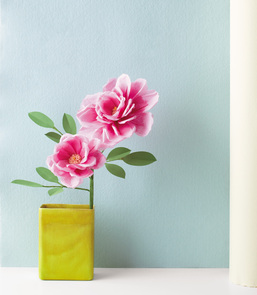 Livia's calm, supportive tone carries from the introduction through the instructions as she explains how to create each bloom. For the delicate muscari, tissue paper is wrapped around a pencil to form the blossoms. Other flowers have pointed or shaggy petals. The Matilija poppy (below, center photo) is over a foot in diameter. I don't have room to feature all the lovely creations here. The book's image gallery has a few more, but still no orchids or lilies, cactus flowers or foxgloves, fritillaria or filler fluff. There are instructions for all these in the book, using surprisingly simple techniques. 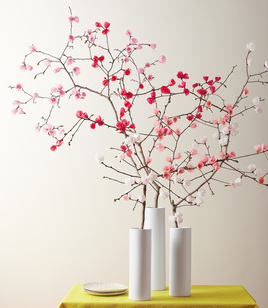 Part 1 covers the basics of flower making: tools, materials, and techniques. After an overview of paper types and an explanation of grain, this section includes photo tutorials of techniques such as dip-dyeing, tie-dyeing, painting, and taping. Part 2 gives step-by-step instructions for making 26 different flowers, and Part 3 contains 18 project ideas for mobiles, head wreaths, cake decorations, and other arrangements to wear or display. Throughout, Livia directs us toward achieving a natural look, which usually coincides with the least fussy method.
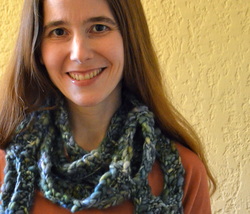
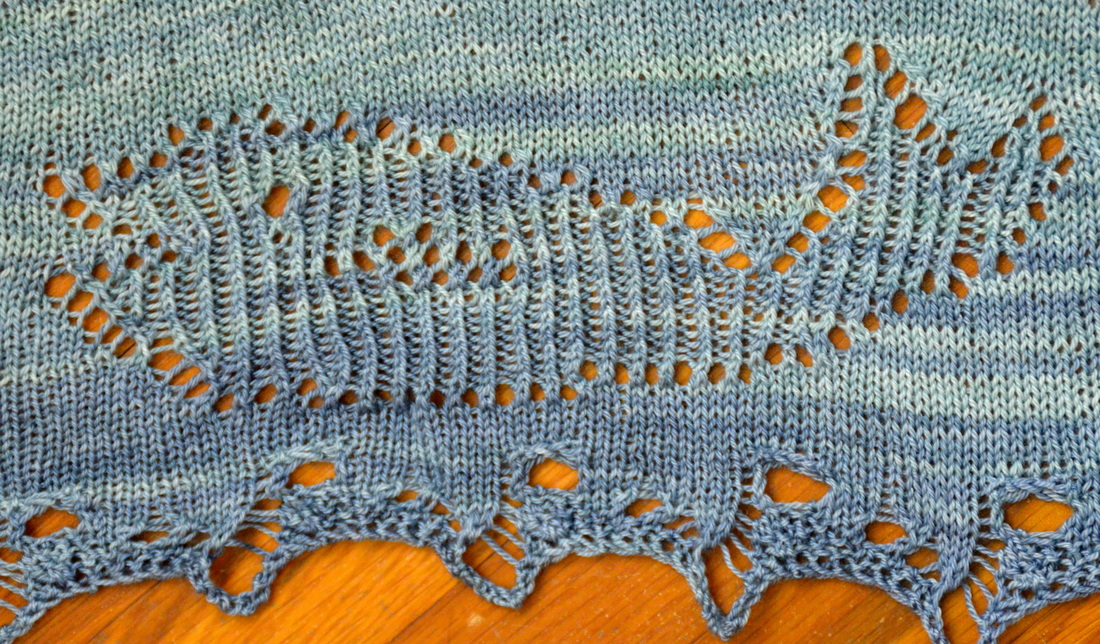
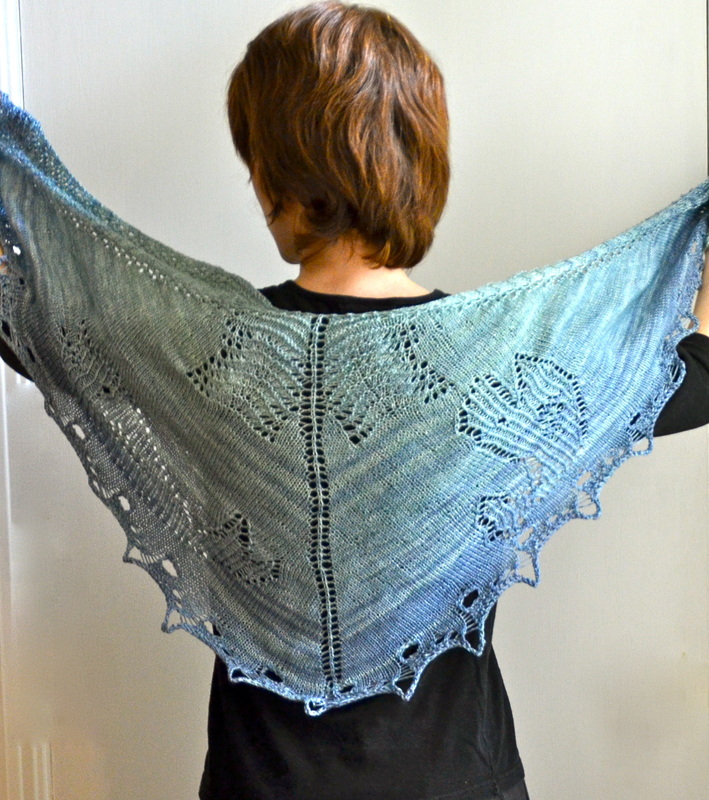
 Addie Juell's photography is perfect. Using backdrops of paper (what else?), she captures the essence of each individual species. The projects are mostly easy, but some require practice and others require stamina. This gorgeous book is a wonderful resource for anyone who likes to smarten gifts, cakes, houses, hair, or life in general with pretty little touches. Disclosure: Stewart, Tabori & Chang sent Kangath a free copy of this book for review. Kangath was not compensated for the preceding review. All opinions expressed in the review are solely the blog author's.  I want to give my daughter's piano teacher an end-of-the-year gift. She gives lessons at her home and has many different slippers and house shoes, so I thought I would knit her something from Katie Startzman's The Knitted Slipper Book. My daughter and I chose these pompom flats as slippers she would probably enjoy wearing. They were a very quick knit---but then there are the pompoms to make. I have never had good luck making pompoms. They're supposedly so simple, and I thought with my daughter's help and Katie's photo tutorial I could easily make enough for these flats. I was mistaken. Out of several tries each day, I was lucky to have one good one to show for it. What was the problem? I couldn't get the knot tied tightly enough, even with my daughter's magic touch assisting. Finally I got the idea to wrap the yarn in as narrow a strip as possible---not necessarily tightly, just on top of itself. And for whatever reason, that worked for us. We finished five pompoms in one sitting. Now I just have to sew them on. . . . 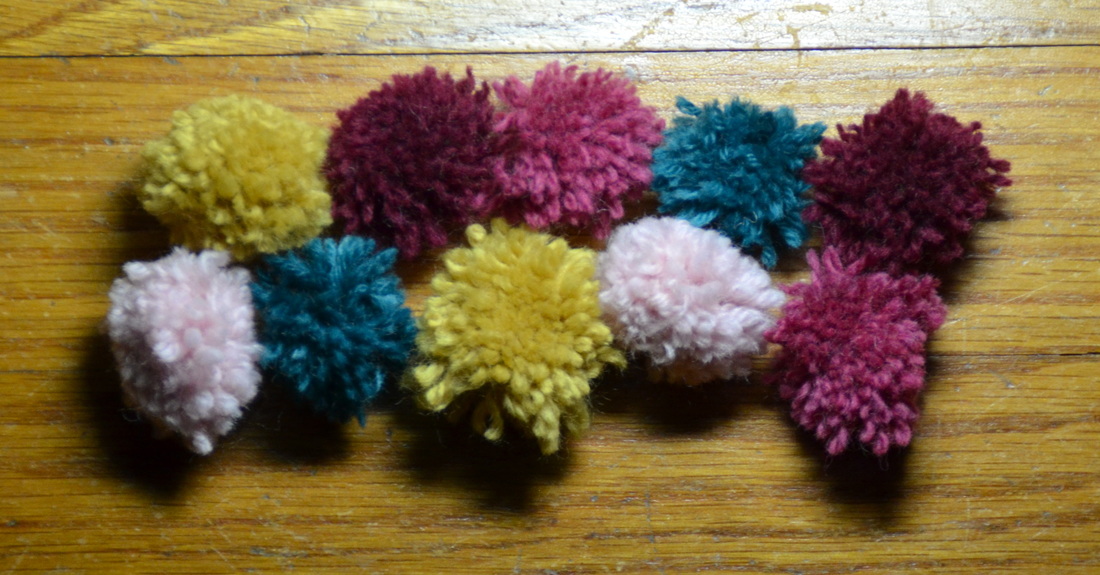 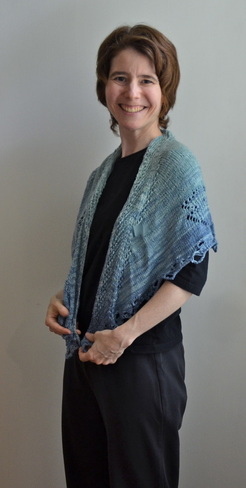 The Unique Sheep asked me to design another shawl for their Zodiac Club. Last year I designed Taurus (in the shape of the Taurus symbol), which is now for sale to non-club members. Pisces features fish done in picture lace and repeats of the constellation Pisces along the border. This crescent shawl fits wonderfully. The shape ensures that it stays on during all but the most vigorous arm movements, and the Tinsel Toes yarn drapes beautifully. The colorway is one of Unique Sheep's signature Gradiance dyes. The result looks like it's been knit in one color and dipped in another. I used leftovers from this Pisces gradience colorway for the Sarah Wolbert mitts. The shawl pictured here is the prototype. In the actual pattern the fish are spaced differently and the border has the constellations swimming in some of the garter waves that cascade down the sides of the shawl. (Thanks to test knitter Kelly Eells for the idea!) 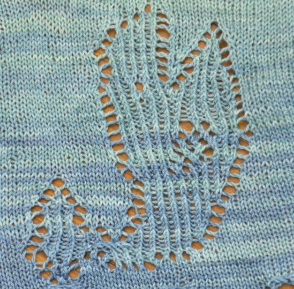 This design was a real struggle, but now that it's finished it's a quick knit. There are both written instructions and charts for the garter wave edging and top, and charts for everything else. One club member finished it in less than a week. The tencel in the yarn makes it feel actually cool to the touch, and this would make excellent beachwear. I plan to write another version with more garter waves in place of the lace fish. It should be ready by the time pattern sales open to non-club members.
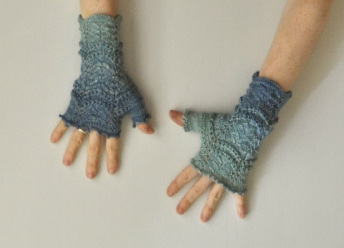 I made these mitts a while ago for my sister Sarah but I was waiting to send them until I could get a photo of them and I wanted to take a photo of them using the camera remote I got for Christmas and it's not quite six months after Christmas so I think I'm doing well. Unfortunately, the remote doesn't help the camera focus. . . . 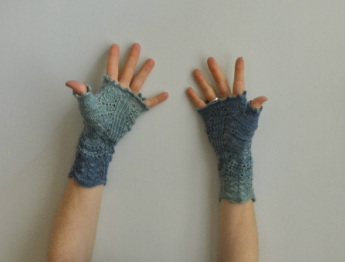 These are Brenda Castiel's Nancy Pearl mitts. The pattern was error-ridden, but I worked it out. The mitts are lovely and worked up quickly, even though they took more brain power than I was prepared to give. My sister wears mitts all the time, so I thought they would be a welcome gift, especially this winter. Luckily the Tinsel Toes yarn is tencel and actually feels cool, so they won't be out of place this summer. 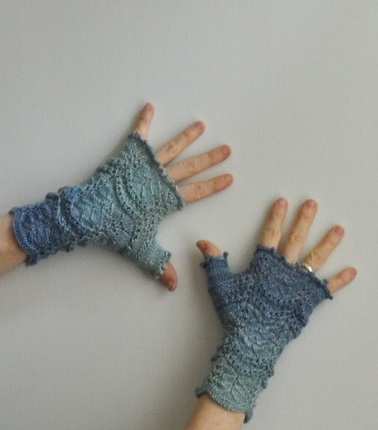 |
Hi! I'm Kangath---knit designer, musician, writer, and mother 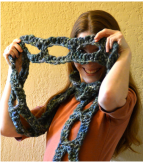
Click here to join the Kangath Knits email list
for insider updates and special deals. Subscribe to
Kangath Knits: 
Ruth Roland is a top Baton Rouge, LA music lesson instructor on TryMusicLessons.com! Good ReadsAmy Herzog Designs
canaryknits dull roar Knit and Tonic Linda Marveng needled Ramblings The Sexy Knitter Sheep to Shawl Trappings and Trinkets Two Sides of the Same Stitch Yarn Harlot Archives
February 2018
Categories
All
|
 RSS Feed
