 I never could draw very well, but my stroke affected the right side of my body, and I'm right-handed. So writing and drawing became difficult physically as well as aesthetically. But I've been perfecting my tracing skills! I just find a catalogue or magazine model in a pose that would demonstrate the garment's unique aspects, trace her, and draw new clothes on her. Sometimes I have to recreate limbs that are clothed in the original photo but bare in my conception. I'm getting better at it.
There are a three or four photos I find myself repeatedly tracing, just as the models themselves seem to have favorite poses. For me, a good tracing photo has a dark image on a light-colored background. The model is posed to show off her clothing (as opposed to her hair) and there are no confusing elements like foliage or props hiding body parts. It's surprisingly hard to find all these qualities in one shot. No wonder I use the same ones over and over!
0 Comments
 The Dream in Color sweater call gave designers a choice between fingering weight Smooshy and worsted weight Classy for a woman's sweater. (They had similar yarn choices for the baby sweater, but I wanted to design something I could test for fit without having to abduct an infant from an unsuspecting parent's grocery cart.) I was already committed to knitting several other samples, so I chose the heavier weight Classy.
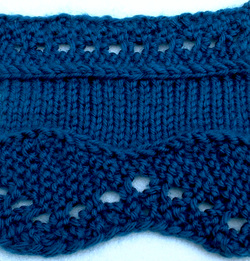
With that yarn in mind, I knew I wanted to use the gorgeous blue Mission Falls 1824 Wool left over from the Gecko Hat. I was just in the mood for that color, I guess. I've also been working in the kitchen a lot recently and liking elbow-length sleeves, and I thought a basic but bold lace cuff at the elbow would be pleasant. Experimenting with knitting the lace sideways onto live stitches, I discovered this undulating pattern. It took me several attempts to achieve, but I adore this version. The same lace would be overkill at the neck, and I personally don't need to attract additional attention to my hips, so I needed a different treatment for the collar and waistband. Going with the simple solutions, the garter eyelet collar and simple hem sounded like they should work. Because Classy is a superwash wool, I wanted the garment to be fitted at the top (in case it stretches in the wash) but have comfortable ease at the bottom: A-line shape. I then chose a wide scoop neckline to point up the width of the garter eyelet. And so my design was born. Dream in Color recently contracted me to design a sweater for them. A specific sweater, whose name is Dylana. Dylana (pronounced DILL-en-ah) is a girl's name of Welsh origin meaning "born of waves." I thought I would take you through my design process from start to finish. This is pretty much what my submission looked like (minus my contact information): 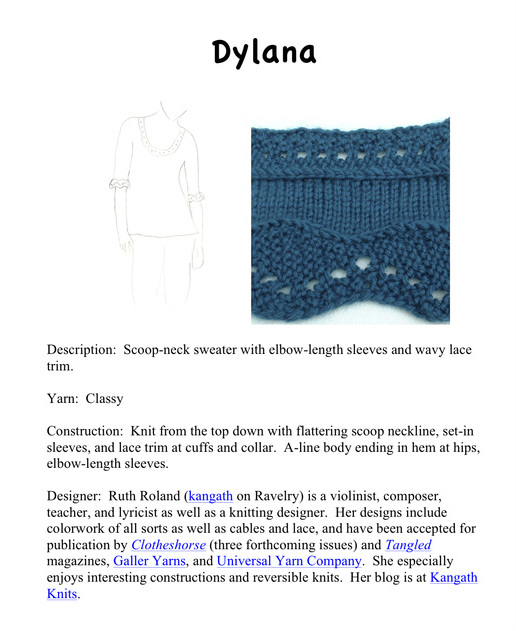 Can you see where the name comes from?
"Classy" is the name of a yarn in their line--a worsted weight superwash merino. While I wait for the yarn to arrive, I've taken some preliminary steps toward writing the pattern. When the yarn comes, I will knit a swatch (slightly bigger than the one in my proposal), measure it, plug in some numbers (stitch gauge, row gauge, collar height, etc.), and be ready to knit! Gwen saw some rag rugs at the store the other day and wanted to try to make her own. I had been saving old T-shirts and jeans for just such a project, so we sat down the other day and went to work. 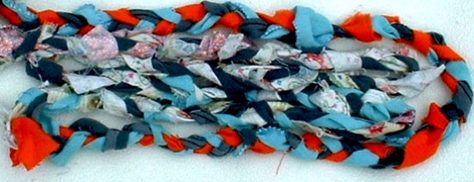
This is as far as we got before she got tired. I think it's charming! I have always loved the look of rag rugs---the irrepressibly homemadeness of them, irregular and knotty. And I reveled in her bubbly chatter and rapt expressions while we worked together. I hope she comes back to it so we can finish it.
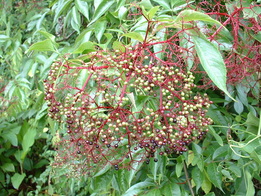 By writing about her harvest, Becky inspired me to write about my lack thereof. Some things, like elderberries and rosemary, take care of themselves. Other things need to be, well, planted--which I am reluctant to do because I know they will also need to be watered and weeded. Our CSA, Port Hudson Organics, is done for the season. The drought seems to be over as well (here). So what excuse do I have for not planting? 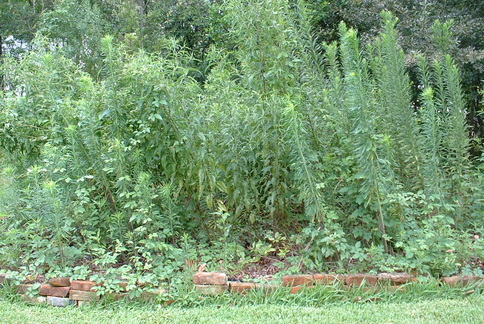
The thought of weeding this plot---only one of four of my pre-stroke gardens---is so daunting that I'm tempted to mend clothes, finish Dave's socks, clean the refrigerator with my tongue---anything, rather than begin. I need new garden gloves, I say, and wake up early to go to the Farmer's Market rather than plant. But I miss my garden, and this fall might be the time to buy those gloves. 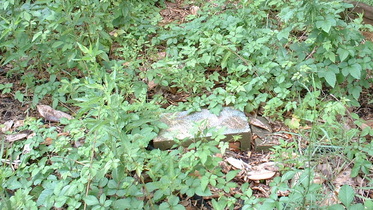 Here you can barely see one of the stepping stones painted by my son and lovingly placed at the intersection of four brick paths. You have to be extremely vigilant to garden in Louisiana because if you turn your back your watermelon seedlings are likely to be strangled by, well, by that vine you see creeping all over the bricks. I did more than just turn my back---I took a few months off.  My friend Kris came down and helped me clean out the back garden after my stroke (or weeded it and planted some squash seeds while I watched helplessly from a patio chair), but I didn't take care of it---it turned out to be a lower priority than sleeping, trying to knit, and burning myself flipping pancakes.
On a happier noter, the rosemary's burgeoning! Roasted potatoes, anyone? 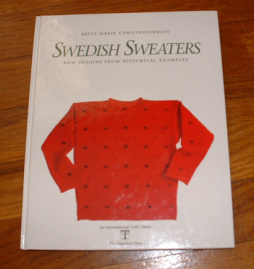 Swedish Sweaters by Britt-Marie Christoffersson, pub. The Taunton Press, 1990 This is a wonderful, rich book. The first section is a study of museum pieces and other 19th century sweaters, replete with charts, gauge information, sweater type, and in some cases even helpful hints for construction. The second section contains full patterns for sweaters inspired by the historical garments and in many cases how they were developed. The first section is most interesting to me. An experienced knitter could easily reproduce the garments with the given information; a budding designer could use the interesting shapes and techniques, like the author has, for inspiration. The sweaters are not modeled, but they are displayed in such a way as to show important details. 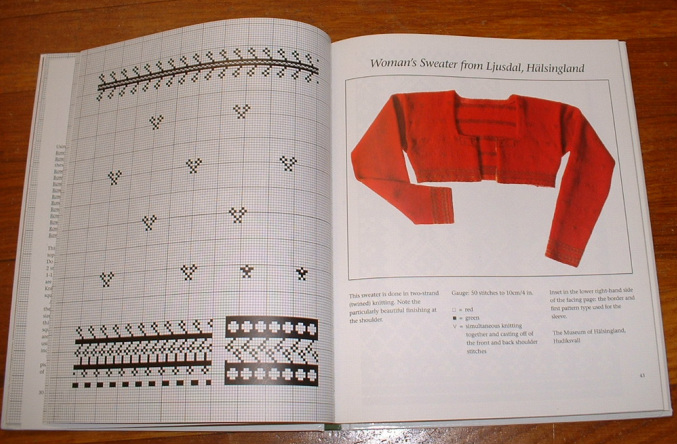 The second section contains interesting patterns derived from the historical examples in sometimes surprising ways. The photograpy is adequate, the sweaters are modeled, and the writing clear. The sweaters and scarves range in difficulty from basic to experienced.
A fascinating book for any knitter, whether or not they are particularly interested in Swedish knitting. Disclosure: Kangath reviewed her personal copy of Swedish Sweaters. Kangath was not compensated for the preceding review. All opinions expressed in the review are the blog author's and are not necessarily the opinions of Taunton Press or Britt-Marie Christoffersson. 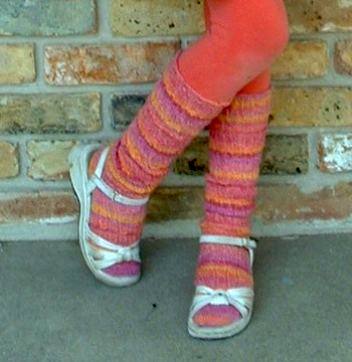 I just realized I finished these socks almost 6 months ago but was too busy to post about them.
They're the Punctuated Rib socks from Knitting Socks with Handpainted Yarns. I made a child's size and knee highs, but otherwise it's the same pattern. You can almost see the stitch detail on the right foot. Gwen chose this yarn, and I knit one sock. Then I got busy. Meanwhile, she was growing. By the time I got around to knitting the second sock, the first on was too small! Fixed by dropping a purl stitch down to the heel, then knitting the second sock at a looser gauge. Whew! I really didn't want to reknit the sock. I had already broken two needles on that Punctuated Rib pattern (and I'm a fairly loose knitter). Needless to say, I switched to metal needles after it was clear that the stitch pattern didn't get along well with bamboo! About the book: it has a lot of sweet patterns in it, patterns I'm looking forward to knitting. And if you don't know anything about working with handpainted yarns, it will have some useful information for you. Unfortunately, for me that first informational section of the book (only 14 pages long, with generous use of photos) wasn't worth the price of the book (and I bought a discounted damaged copy through Interweave). Which just means I have to knit some more of those patterns! 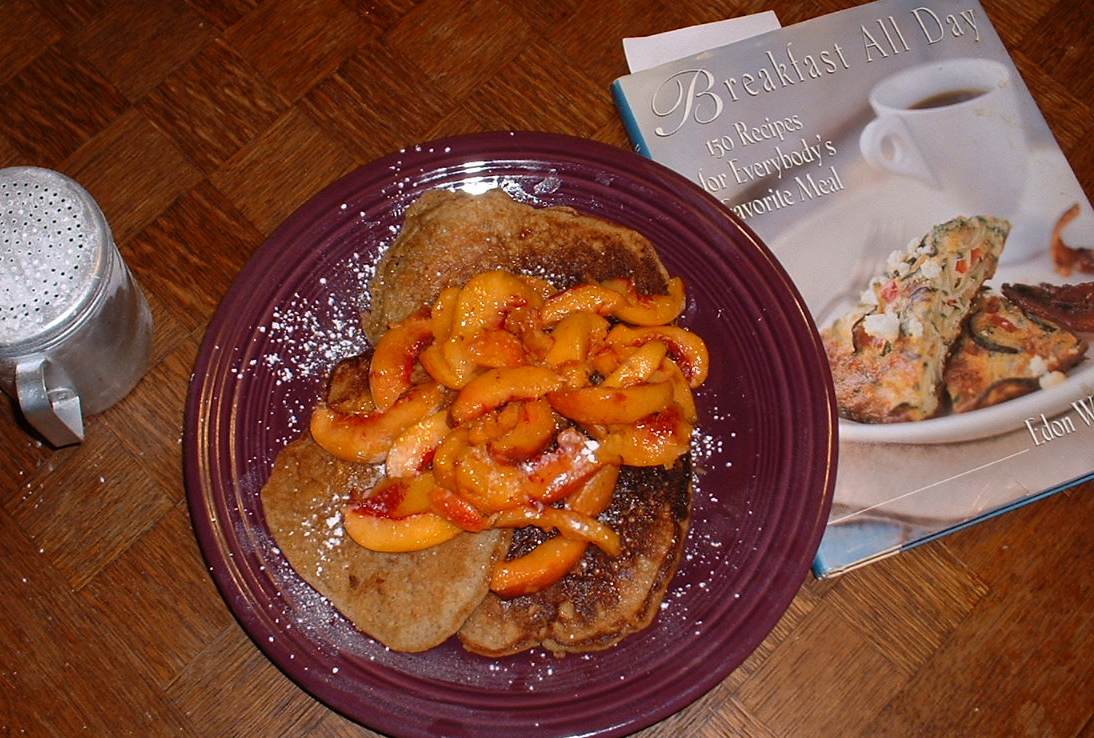
Whole Grain Pancakesrecipe adapted from Breakfast All Day by Edon Waycott
1 cup whole wheat flour 3/4 cup white whole wheat flour* 2/3 cup yellow cornmeal 1 Tablespoon baking powder 1 teaspoon baking soda 1/2 teaspoon salt 1 teaspoon cinnamon 1/4 cup cane syrup** 3 Tablespoons oil 3 large eggs 2 cups buttermilk 1 teaspoon vanilla extract ix together the first seven ingredients, make a well in the center, add the rest of the ingredients, and stir just until moistened. Heat skillet or griddle over medium heat. Pour on 1/4 cups of batter and cok until the tops are bubbly. Flip pancakes and cook until lightly brown. Serve with fresh peach slices and powdered sugar. *available at most grocery stores--a good substitute for all-purpose flour--lighter taste and texture than regular whole wheat **also available at most grocery stores, but I'm lucky enough to be able to get mine at the Red Stick Farmer's Market This section of the tutorial will cover combining shapes and turning lines into curves. Let's say we want to draw the schematic for a cape. We can first draw several shapes . . . 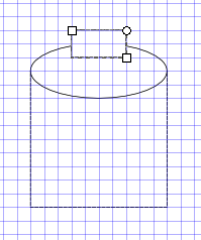 . . . then select them (with the select tool) . . . 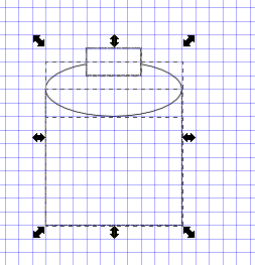 . . . then go to the Path menu . . . 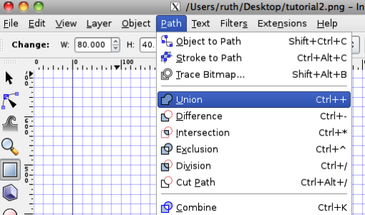 . . . and choose Union. The shapes will merge and the inner lines disappear. Here is the final cape schematic, with a center dividing line and a dotted hemline. 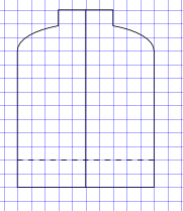 Neat, huh? Now let's make a curve. First we draw a few segments. (This is a waistline.) 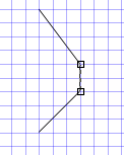 Then we choose "Edit paths by nodes" from the toolbar. 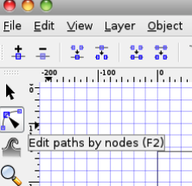 Now we select the two nodes of the middle segment (click on the first one, then shift-click to select additional nodes) and press shift+U. One node has a red dot on top of it. 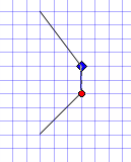 Move the dot until you get the curve you want. Ignore the line connecting the dot to the curve. (It's a tangent line.) 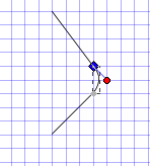 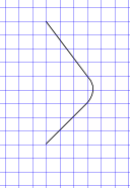 Ta-da!
In this section of the tutorial, we'll label the schematic using lines and circles. Lines first. Draw lines (using the pen tool) for every flat measurement on your schematic. 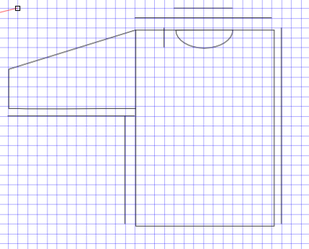
Notice I have measurements for cross-back and collar, and I put the shorter line on top. Next, use the select tool (F1) to select all the measurement lines. Go to Object--Fill and Stroke--Stroke style and choose start and end markers. 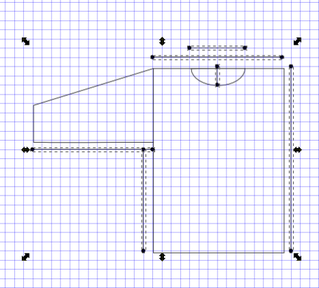
Now for the round measurements. We'll use the circle tool for these. 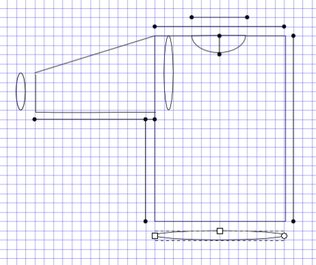
You can leave them like this, or you can make them into arcs. Move the round nodes, then click "Switch to arc" at the top of your window. 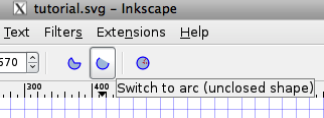
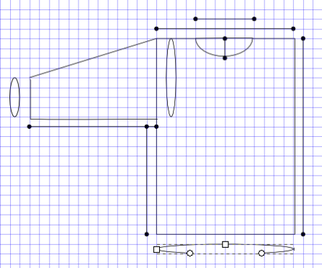
Again, select them all, then add start and end markers. 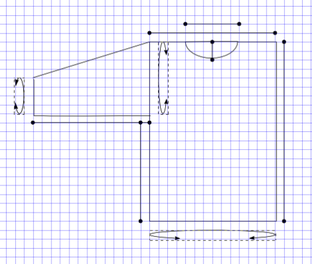
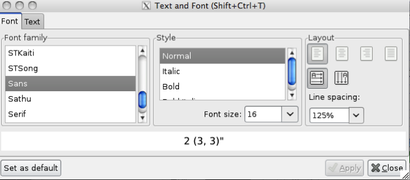
Now add numbers with the Text tool. 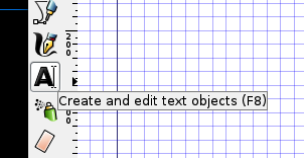
Once you have entered some text, you can fine-tune it using the Text and Font dialog. 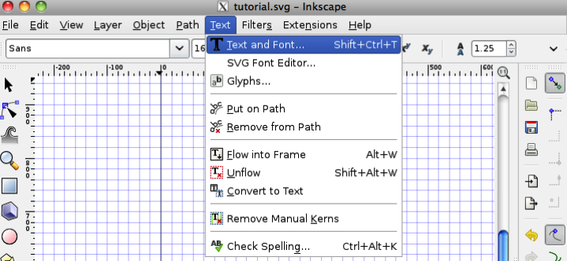
And there you have it. 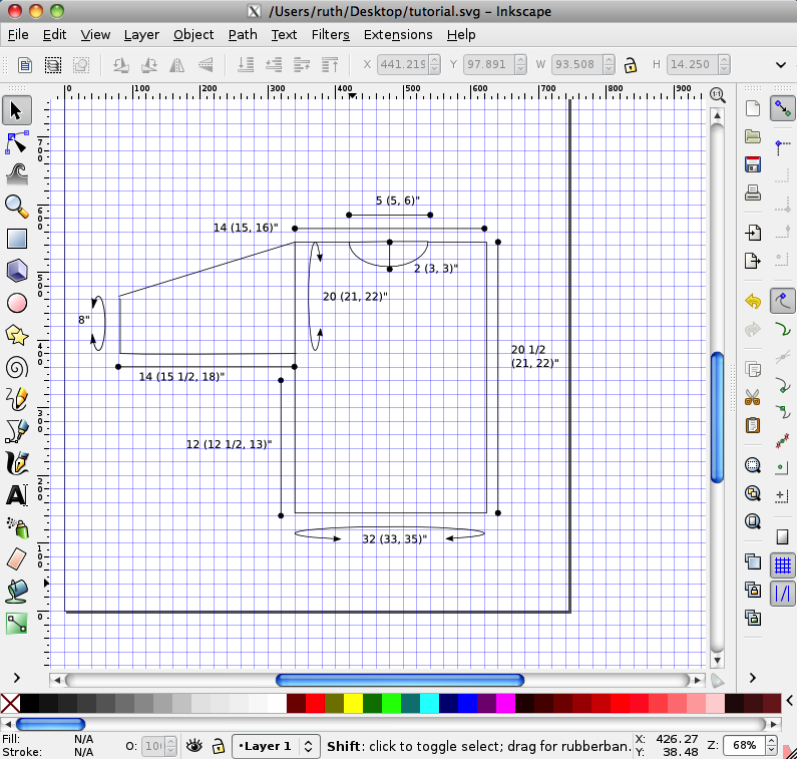
Next up: combining shapes (my favorite!)
|
Hi! I'm Kangath---knit designer, musician, writer, and mother 
Click here to join the Kangath Knits email list
for insider updates and special deals. Subscribe to
Kangath Knits: 
Ruth Roland is a top Baton Rouge, LA music lesson instructor on TryMusicLessons.com! Good ReadsAmy Herzog Designs
canaryknits dull roar Knit and Tonic Linda Marveng needled Ramblings The Sexy Knitter Sheep to Shawl Trappings and Trinkets Two Sides of the Same Stitch Yarn Harlot Archives
February 2018
Categories
All
|
 RSS Feed
