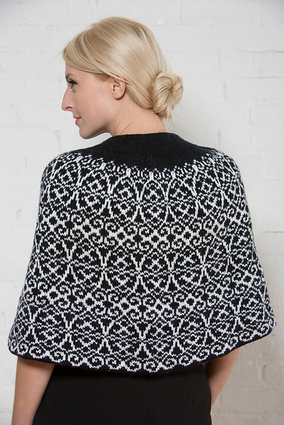
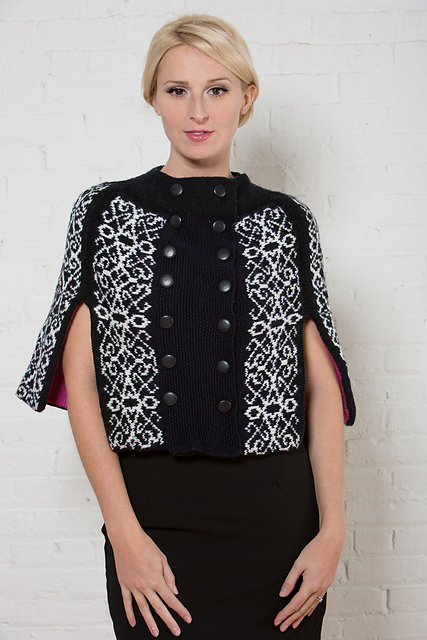
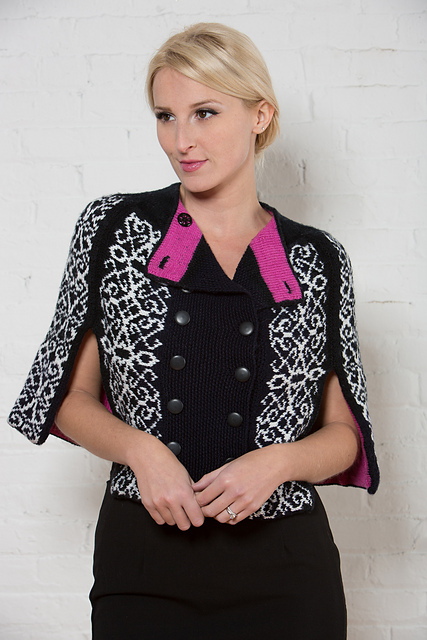
 My capelet Baroque is in the most recent issue of Clotheshorse. I enjoyed knitting this so much I was sorry when it was finished. I loved the rhythm of the colorwork pattern, the orchid pink lining, the assembly and the buttons (especially that cute little jigger!). In fact, I enjoyed knitting it so much I immediately wanted to make another (orange and red with a yellow-brown lining) but the local yarn store didn't have the right colors and ordering online is risky since I can't count on my browser to accurately represent colors. Soon I was working on other projects, but this capelet was never far from my mind. I was pleased (not quite the right word---more like jumping up and down clapping and squealing) that Mindy and Heather chose this piece for their magazine. I really wanted to make it, and (since they will eventually return it to me) wear it. It's very cushy, all snuggly and warm, and will be most welcome in the damp of our Louisiana winters. It also looks elegant with my orchestra black, and folds up smaller than a coat. I can't wait to try it on in January instead of June!
2 Comments
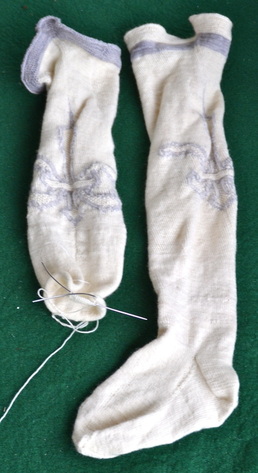 So here's the pair of Dave's stockings as they are now (or were until I worked on them a little more yesterday while waiting for my kids at various goings-on).
The different color cuffs will hide unseen under his breeches and are because I decided to try the "two socks on one circular needle" method and thought two different colors would be prudent. I chose this method for this project because I seem incapable of getting identical length socks using only a tape measure. I now have a serious aversion to this method of sock knitting, and I think most of the blame goes to my ill-fated attempt to use it first on a project which required 18" garter cuffs on size 000 needles. I separated the socks after the grey stripe on the finished one, and it will be quite some time before I give this method a chance to redeem itself. The socks feature giant fleurs-de-lis on the back calf, done in seed stitch with a double outline of silver, and a garter stitch crease down the leg to the heel. They will have the French Heel and Toe from Nancy Bush's Knitting Vintage Socks. The socks are taking so long to complete (I started them years ago) partly because I don't see this as a marketable pattern. They are purely a labor of love---and I know they will be appreciated! 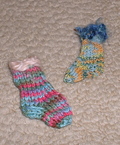
 This morning I realized hadn't yet shown you my newest Little Sock. Here it is in all its (unblocked) glory. I modified the heel a bit, working it on half the stitches instead of a smaller portion. Looks good this way, too.
I'm giving these along with charity donations to friends and family. That way they get something tangible from me and feel useful at the same time. 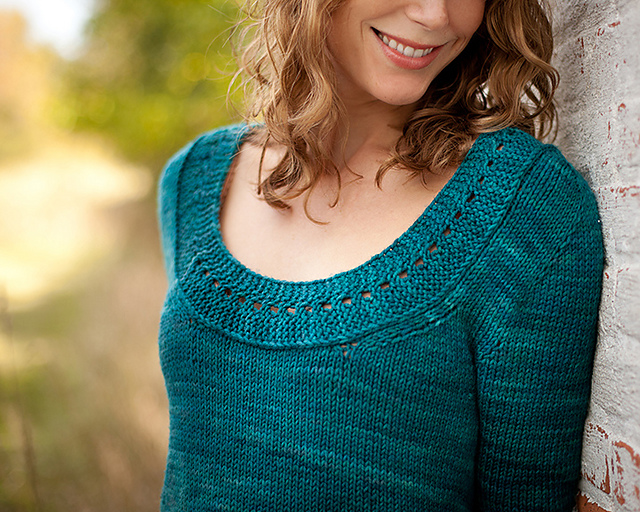
Last night I logged on to Ravelry and found my Dylana pattern had been uploaded! I really love this design and intend to knit one for myself someday.  It's worked top-down using SusieM's contiguous sleeve method. I modified the method slightly to accommodate the wide neckline and to give the shoulders a different arch. The collar is really clingy and springy, and the cuffs (at the elbow) are frilly without being obtrusive. The A-line shape works wonderfully with wool---the sweater clings to the waist without any decreases, and the hip increases allow the tunic to fit well over jeans. I love the bottom hem---done without any sewing! I love avoiding sewing on principle, though sewing knit to knit is really almost pleasant. 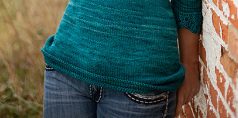 The yarn is Classy from Dream in Color. It's available in so many yummy hues that it will be hard to choose just one for this sweater. My sample is in Bermuda Teal, a gorgeous head-turning semi-solid blue-green. Mmmmmmm.
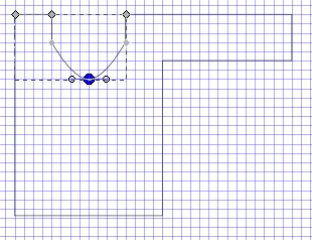
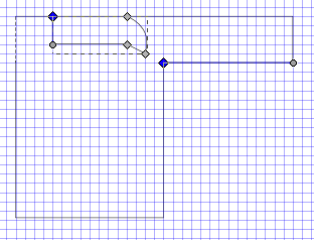
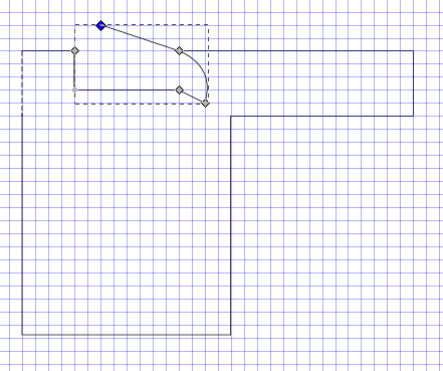
In this section of the tutorial we will make nodes corner, smooth, or symmetric, and make selected segments into lines or curves. 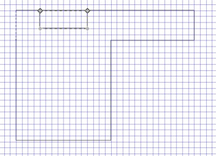 Begin by drawing the schematic you see here. Review the earlier sections of the tutorial if you're unsure how (scroll down for the earliest ones). Choose the Nodes tool from the toolbar on the left-hand side of your Inkscape window (2nd one down) and click on the collar. Across the top of your Inkscape window you should see several icons. There should be faint gray vertical lines between the 2nd and 3rd, the 4th and 5th, and the 6th and 7th icons. We will be using the 7th - 10th and 11th & 12th icons in this section of the tutorial. Select the node at the lower left corner of the collar and press Shift +C or click the 7th icon. It should say "Make selected nodes corner" when your mouse hovers over it. This will split the node into two nodes which angle (rather than arch) away from each other when dragged. 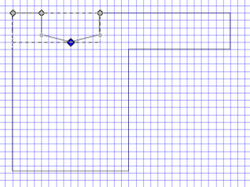 Drag one of the nodes down one square and to the center of the collar. Now click on the 8th icon (or press Shift+S). 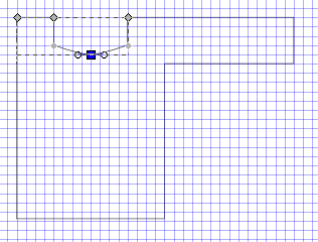 You should see two handles coming out of the node. Drag one out to the edge of the neckline. 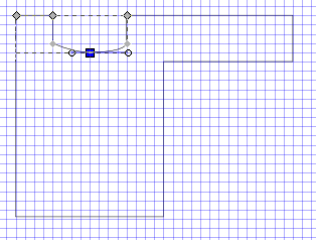 We have just "smoothed" the node. Let's make it symmetric by clicking the 9th icon.  Isn't that neat? Drag the node a little farther down and see what happens. Now click the 10th icon or press Shift+Y. This activates the Auto-Smooth function, which changes the curve a little but mostly makes a difference when moving adjacent nodes.
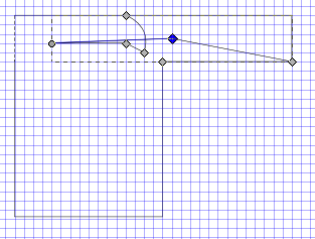
Try changing from Auto-Smooth and back, moving the adjacent nodes each time, to see the difference. Now let's make those smooth curves at the bottom of our collar back into straight lines. Select two adjacent nodes at the bottom of the neck, and press Shift+L or the 11th icon. 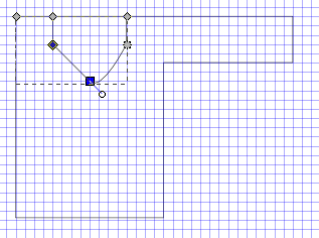 Now press Shift+U (or the 12th icon) to change it to a curve. Move the handles until you're satisfied. Notice this doesn't change it back to the same curve. You'd want Edit--Undo (Ctrl+Z) for that.  These are really useful tools--I hope you enjoyed learning about them.
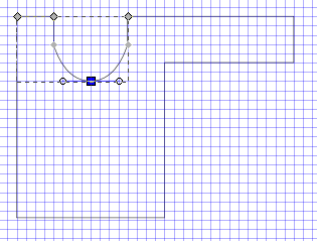
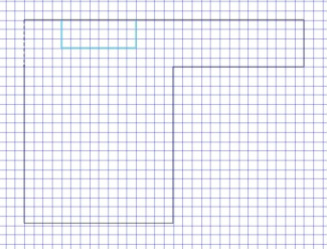
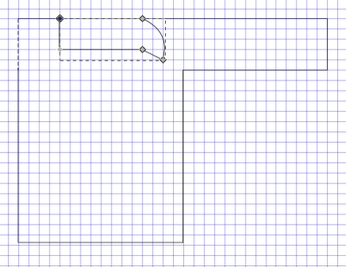
Visit the whole tutorial here. This section of the tutorial will cover nodes, or those little knobby things along a line that you can manipulate to suit your drawing. We will select, move, add, and subtract nodes, join two nodes into one or connect them with a new segment, split one node into two or delete a segment that connects them. In Part 2 we will make nodes corner, smooth, or symmetric, and make selected segments into lines or curves (very cool!).  Begin by pressing F2 or selecting the Nodes tool from the toolbar. The Nodes tool is second in line, right beneath the select tool (plain arrow). Now click on any object to select.
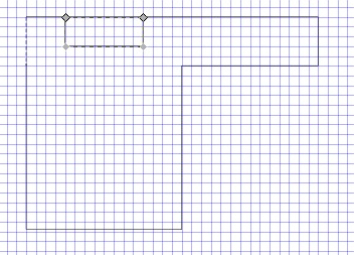
Large and small square nodes appear. Click on a node to select it, or the segment between two nodes to select both nodes. Shift+Click selects several nodes in succession. Tab selects the next node; Shift+Tab selects the previous node. Click anywhere outside the line to deselect all nodes. Make a schematic similar to the one above, with a square neckline. Click on one of the small nodes and drag it diagonally downward. 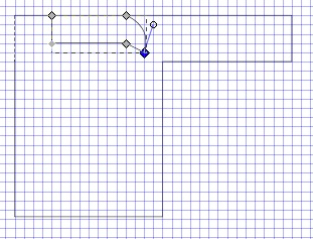 The blue line with a circle at the end is called a handle. You can select and drag it, too. See what happens when you do. Ctrl+Drag restricts a node's movement to horizontal or vertical, and Ctrl+Alt+Drag takes it along the direction of the node's handles. You can also use your keyboard's Arrow keys to move nodes. Across the top of your Inkscape window (in Node mode) there should be a row of icons. If you hover your mouse over each one you can read a description of its function. Select the node or segment first, then click on the icon to implement. If you're as bad with a mouse as I am, you may prefer keystroke commands. Double-click or Shift+Alt+Click anywhere on a selected path to add a new node at that point without changing the shape of the path. Ctrl+Alt+Click to delete. Now I'm going to show you a few tricks that may or may not be useful to you in drawing schematics. First up is Join Nodes. Select two end nodes. In this case, the one at the top corner of the collar and one on the sleeve. First I selected the sleeve line with Shift+Click, then the nodes one at a time using Shift+Click for the second one I chose. The lower nodes of the collar won't work for this because they are along the path of the neckline, but you can choose either sleeve node.
Then choose the third icon which shows two nodes being made into one. Nifty, huh? Undo all that (Edit -- Undo or Ctrl+Z) and choose the two nodes at the top of the collar. Choose the sixth icon, the one that shows two nodes connected by a segment becoming open (unconnected). Whee! Now connect them by clicking the fifth icon. What about the fourth icon? This one's pretty neat. It splits the node into two nodes in order to move them separately.
I found the Inkscape manual very helpful in preparing this tutorial. A great resource!
Next up: Nodes Part 2 including some really wonderful features. 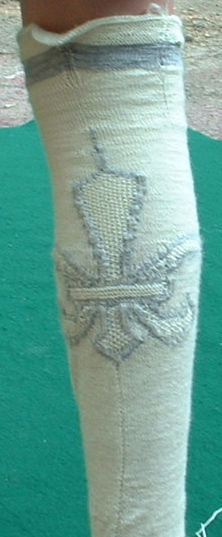 Not Dave. I forgot to take my camera with me to Ithaca. Too bad, because there were several camera-worthy events that I wasn't able to chronicle. I'm sure my phone has a camera on it, but I haven't even tried to figure out how to use it and I sure don't know how to hook it up to my computer. I should really enter the 21st century one of these days.
Remember Dave's period stockings? Well, Dave and I got together in Ithaca and he actually tried on the finished one. It fits beautifully! I had been worried about the fit because
Dave was thrilled with his one stocking and can't wait for its partner. He vowed to use, appreciate, and enjoy anything I ever wanted to knit for him. It's good to have devoted friends. 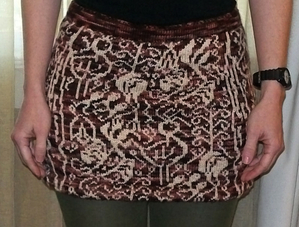 My recently released San Graal was one of the garments featured on the Clotheshorse blog modeled at a trunk show at Yarns in the Farms. The photo at right is not from the trunk show---I just wanted to show you how great it looks with tights!
We're leaving tomorrow for our molasses moon, so I expect the blog to be pretty quiet until I get back on Tuesday. Have a great weekend! |
Hi! I'm Kangath---knit designer, musician, writer, and mother 
Click here to join the Kangath Knits email list
for insider updates and special deals. Subscribe to
Kangath Knits: 
Ruth Roland is a top Baton Rouge, LA music lesson instructor on TryMusicLessons.com! Good ReadsAmy Herzog Designs
canaryknits dull roar Knit and Tonic Linda Marveng needled Ramblings The Sexy Knitter Sheep to Shawl Trappings and Trinkets Two Sides of the Same Stitch Yarn Harlot Archives
February 2018
Categories
All
|
 RSS Feed
